“`html
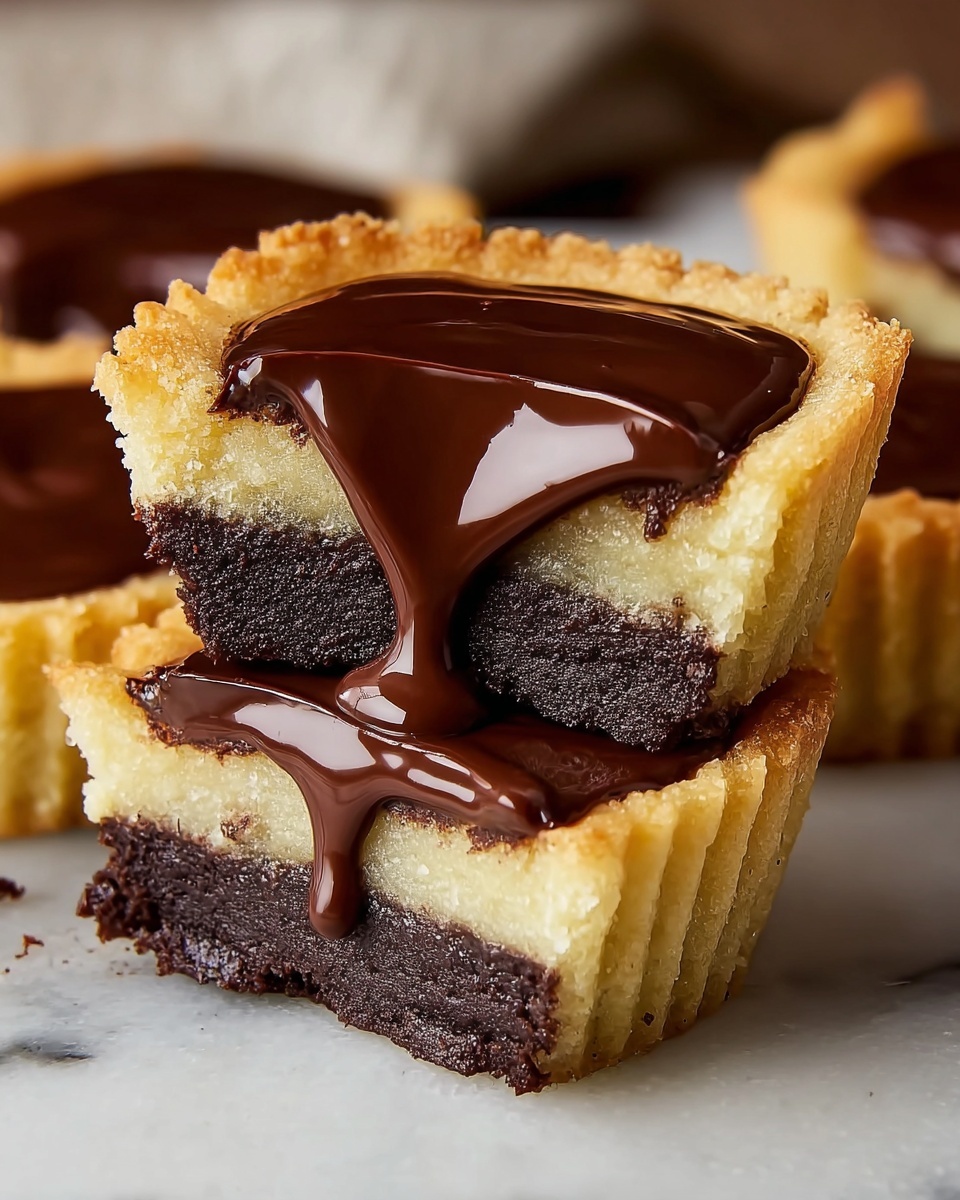
If you love all things sweet, rich, and irresistibly chocolatey, then the Twix Cookie Cups Recipe is about to become your new favorite treat. These delightful bite-sized desserts combine a crisp, buttery cookie base with a luscious caramel center and a smooth milk chocolate topping, capturing the essence of a classic Twix bar in a perfectly portable cup. They’re easy to make but feel like a gourmet indulgence, perfect for sharing with friends or sneaking a few for yourself whenever a craving strikes.
Ingredients You’ll Need
This recipe shines because of its simple yet essential ingredients, each one playing a vital role in creating the perfect balance of texture and flavor. From the buttery cookie base to the creamy caramel and rich chocolate, every component brings something special to the table.
- 1 cup All-purpose flour: The foundation of the cookie dough, providing structure and tenderness.
- 1/4 tsp Baking soda: Helps the cookies rise slightly and become light.
- 1/4 tsp Salt: Enhances all the flavors and balances the sweetness.
- 1/2 cup Butter (softened): Adds richness and moisture to the cookie base.
- 1/4 cup Granulated sugar: Contributes sweetness and a bit of crispness to the cookies.
- 1/4 cup Brown sugar (packed): Offers a subtle molasses note that deepens the flavor.
- 1 Large egg: Binds the dough and gives it a soft, chewy texture.
- 1 tsp Vanilla extract: Infuses warmth and classic cookie flavor.
- 1/2 cup Sweetened condensed milk: The secret behind that luscious caramel filling.
- 1/4 cup Light brown sugar (packed): Sweetens and thickens the caramel with rich, buttery notes.
- 2 tbsp Butter: Adds smoothness and a creamy finish to the caramel.
- 1/2 tsp Vanilla extract: Elevates the caramel’s flavor with depth and warmth.
- 1/8 tsp Salt: Balances the sweetness in the caramel for that perfect bite.
- 1 cup Milk chocolate chips (or your favorite chocolate): The crowning glory that makes these cookie cups utterly addictive.
How to Make Twix Cookie Cups Recipe
Step 1: Preheat and Prepare
Start by preheating your oven to 350°F (175°C). Grease a mini muffin tin or line it with paper liners to ensure the cookie cups come out perfectly without sticking. This prep step will make your life easier when it’s time to bake.
Step 2: Make the Cookie Dough
Mix together the flour, baking soda, and salt in one bowl—you’ll want these dry ingredients well combined. In a separate bowl, cream the softened butter with granulated and brown sugars until the mixture looks light and fluffy. Adding the egg and vanilla next, mix until fully incorporated. Slowly add the dry ingredients to the wet, stirring until you have a soft dough that’s ready to shape.
Step 3: Form the Cookie Cups
Using about one tablespoon of dough per muffin cup, press the dough into each slot. Flatten the base and create a small indentation in the center with your fingers or the back of a spoon—this will hold your caramel filling later. Taking the time to make an even cup shape means each bite will have the perfect balance of cookie, caramel, and chocolate.
Step 4: Bake the Cookie Cups
Bake these cuties for 8-10 minutes, keeping a close eye for when the edges turn a lovely golden brown. Let them rest in the pan for five minutes afterward, then transfer to a wire rack so they cool completely. This cooling process helps the cookie cups maintain their shape and prevents the caramel from melting the base later.
Step 5: Prepare the Caramel Filling
Combine the sweetened condensed milk, brown sugar, butter, and salt in a small saucepan. Over medium heat, stir constantly until the mixture thickens and begins to simmer—this usually takes about 5 to 7 minutes. Take the pan off the heat and stir in the vanilla extract for a caramel filling that’s smooth, rich, and packed with flavor.
Step 6: Assemble the Twix Cups
Once cooled, spoon about one teaspoon of the warm caramel into each cookie cup indentation. Don’t worry if the caramel is a bit warm—it will set as the whole dessert chills.
Step 7: Add the Chocolate Topping
Melt the chocolate chips in 30-second bursts in the microwave, stirring after each interval so the chocolate becomes silky smooth. Top each caramel-filled cup with a spoonful of melted chocolate, smoothing it out gently for a beautiful finish.
Step 8: Chill and Set
Pop the cookie cups in the refrigerator for at least 30 minutes. This chilling step is key for getting that firm chocolate shell and the perfect bite-size treat that won’t melt in your hand.
Step 9: Serve and Enjoy!
Once your Twix Cookie Cups Recipe creations have set, serve them chilled or at room temperature. Either way, you’re in for a dreamy combination of textures and flavors that will satisfy every sweet tooth.
How to Serve Twix Cookie Cups Recipe
Garnishes
Want to take your Twix Cookie Cups up a notch? Sprinkle a pinch of flaky sea salt on top of the chocolate once it sets to bring out the caramel’s sweetness and add a delightful contrast. You can also add some crushed pretzels or toasted nuts for an extra crunch that complements the soft cookie base beautifully.
Side Dishes
These cookie cups pair perfectly with a scoop of vanilla ice cream or a dollop of whipped cream to balance their rich flavors. For a more indulgent experience, serve alongside a hot cup of coffee or a creamy latte—this combo is pure dessert bliss.
Creative Ways to Present
Thinking of serving them at a party? Arrange the Twix Cookie Cups on a decorative platter with edible flowers or wrapped in colorful cupcake liners that match your theme. You might also stack them in a clear glass jar layered with parchment paper for an eye-catching dessert gift that friends and family will adore.
Make Ahead and Storage
Storing Leftovers
Your Twix Cookie Cups will stay fresh if stored in an airtight container at room temperature for up to two days. Keep them away from heat and humidity to preserve the crispness of the cookie and the integrity of the chocolate topping.
Freezing
If you want to save these delightful treats for longer, they freeze wonderfully. Place them in a single layer on a baking sheet to freeze, then transfer to a freezer-safe container or bag. When properly stored, they can last up to three months, making it easy to enjoy a sweet snack anytime.
Reheating
When ready to enjoy after freezing, simply thaw the cookie cups in the refrigerator for a few hours or overnight. Avoid microwaving as this can cause the caramel to become too soft and the chocolate to lose its shine. Letting them come to room temperature naturally preserves the best texture and flavor.
FAQs
Can I use dark chocolate instead of milk chocolate for the topping?
Absolutely! Dark chocolate adds a slightly more intense cocoa flavor that pairs wonderfully with the sweet caramel and buttery cookie base, giving your Twix Cookie Cups Recipe a sophisticated twist.
Is it possible to make these cookie cups gluten-free?
Yes, you can swap the all-purpose flour for a gluten-free flour blend designed for baking. Just make sure it contains xanthan gum or another binding agent to keep the cookie structure intact.
How do I prevent the cookie cups from sticking to the muffin tin?
Greasing the tin well or using paper liners will help, but you can also use a nonstick baking spray with flour to ensure easy removal. Letting the cups cool completely before trying to remove them also prevents breakage.
Can I prepare the caramel filling in advance?
Definitely! The caramel can be made a day ahead and stored in an airtight container in the refrigerator. Warm it gently before assembling the cookie cups to make spooning easier.
What if I don’t have a mini muffin tin?
You can use a regular-sized muffin tin, but keep in mind the cookie cups will be larger and require slightly longer baking and chilling times. Alternatively, you could shape the cookie dough into small discs and create indentations manually, though the consistency may vary.
Final Thoughts
Making the Twix Cookie Cups Recipe is like giving yourself a mini celebration every time you bite into one. They’re simple enough to whip up on any day but special enough to impress at gatherings or as a sweet surprise for loved ones. Go ahead and try making them—you’ll find these little treats disappear faster than you can say “caramel chocolate goodness!”
“`
Print
Twix Cookie Cups Recipe
- Prep Time: 15 minutes
- Cook Time: 10 minutes
- Total Time: 60 minutes
- Yield: 12 servings
- Category: Dessert
- Method: Baking
- Cuisine: American
Description
These Twix Cookie Cups are delightful mini treats that combine buttery cookie cups filled with homemade caramel and topped with smooth melted chocolate. Perfectly bite-sized, they capture all the flavors of the classic Twix bar in an easy-to-make cookie form, ideal for parties, snacks, or dessert.
Ingredients
Cookie Dough
- 1 cup All-purpose flour
- 1/4 tsp Baking soda
- 1/4 tsp Salt
- 1/2 cup Butter (softened)
- 1/4 cup Granulated sugar
- 1/4 cup Brown sugar (packed)
- 1 Large egg
- 1 tsp Vanilla extract
Caramel Filling
- 1/2 cup Sweetened condensed milk
- 1/4 cup Light brown sugar (packed)
- 2 tbsp Butter
- 1/8 tsp Salt
- 1/2 tsp Vanilla extract
Chocolate Topping
- 1 cup Milk chocolate chips (or your favorite chocolate)
Instructions
- Preheat oven: Preheat your oven to 350°F (175°C). Prepare a mini muffin tin by greasing it or lining it with paper liners to prevent sticking.
- Make the cookie dough: In a medium bowl, whisk together the flour, baking soda, and salt. In a separate large bowl, beat the softened butter, granulated sugar, and brown sugar until the mixture is light and fluffy. Add the egg and vanilla extract, mixing until fully combined. Gradually add the dry ingredients into the wet mixture and mix until a smooth dough forms.
- Form the cookie cups: Spoon about 1 tablespoon of dough into each muffin cup. Press the dough down to make a flat base and use your fingers or the back of a spoon to create a small indentation in the center of each cookie cup, which will hold the caramel filling later.
- Bake the cookie cups: Place the muffin tin in the preheated oven and bake for 8-10 minutes, or until the edges of the cookie cups turn golden brown. Remove from the oven and let them cool in the tin for about 5 minutes before transferring to a wire rack to cool completely.
- Prepare the caramel filling: In a small saucepan, combine the sweetened condensed milk, light brown sugar, butter, and salt. Cook over medium heat, stirring constantly to prevent burning, until the mixture thickens and simmers, about 5-7 minutes. Remove from heat and stir in the vanilla extract.
- Assemble the Twix cups: After the cookie cups have cooled completely, spoon about 1 teaspoon of the prepared caramel filling into the indentation of each cookie cup, ensuring it fills the middle evenly.
- Add the chocolate topping: Melt the milk chocolate chips in a microwave-safe bowl by heating in 30-second intervals, stirring well after each until smooth and fully melted. Spoon a small amount of the melted chocolate over the caramel layer of each cookie cup and smooth with the back of a spoon to cover the caramel evenly.
- Chill and set: Place the assembled cookie cups in the refrigerator for about 30 minutes, or until the chocolate topping hardens completely.
- Serve: Enjoy the Twix Cookie Cups chilled or at room temperature as a delicious homemade treat perfect for sharing.
Notes
- Use paper liners for easy removal of cookie cups from the muffin tin.
- Be sure to stir the caramel constantly to prevent it from burning or sticking to the pan.
- For a richer flavor, consider using high-quality chocolate chips or chopped chocolate bars.
- Cookie cups can be stored in an airtight container in the refrigerator for up to 5 days.
- If you prefer a firmer caramel, allow it to cool and thicken slightly before spooning into cookie cups.


