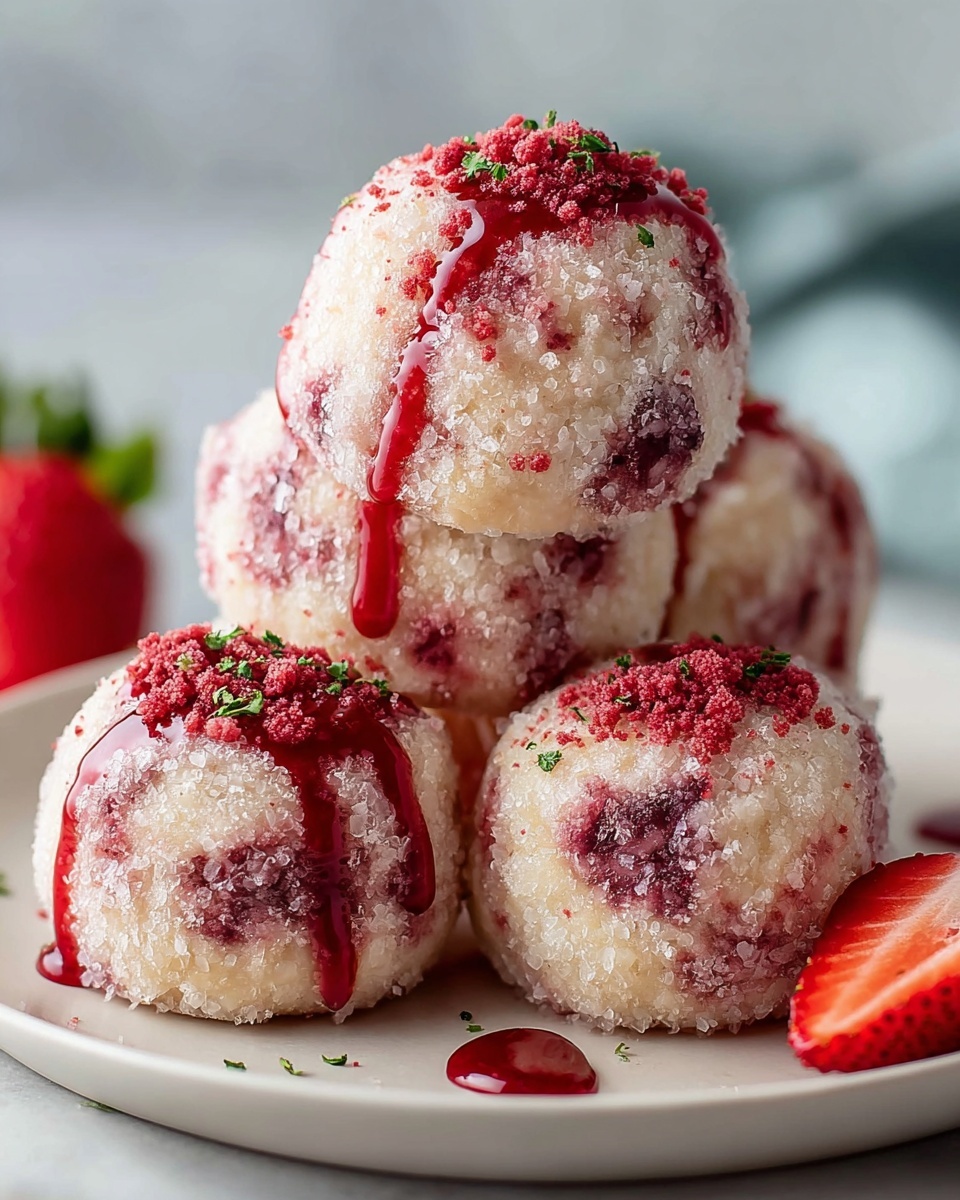
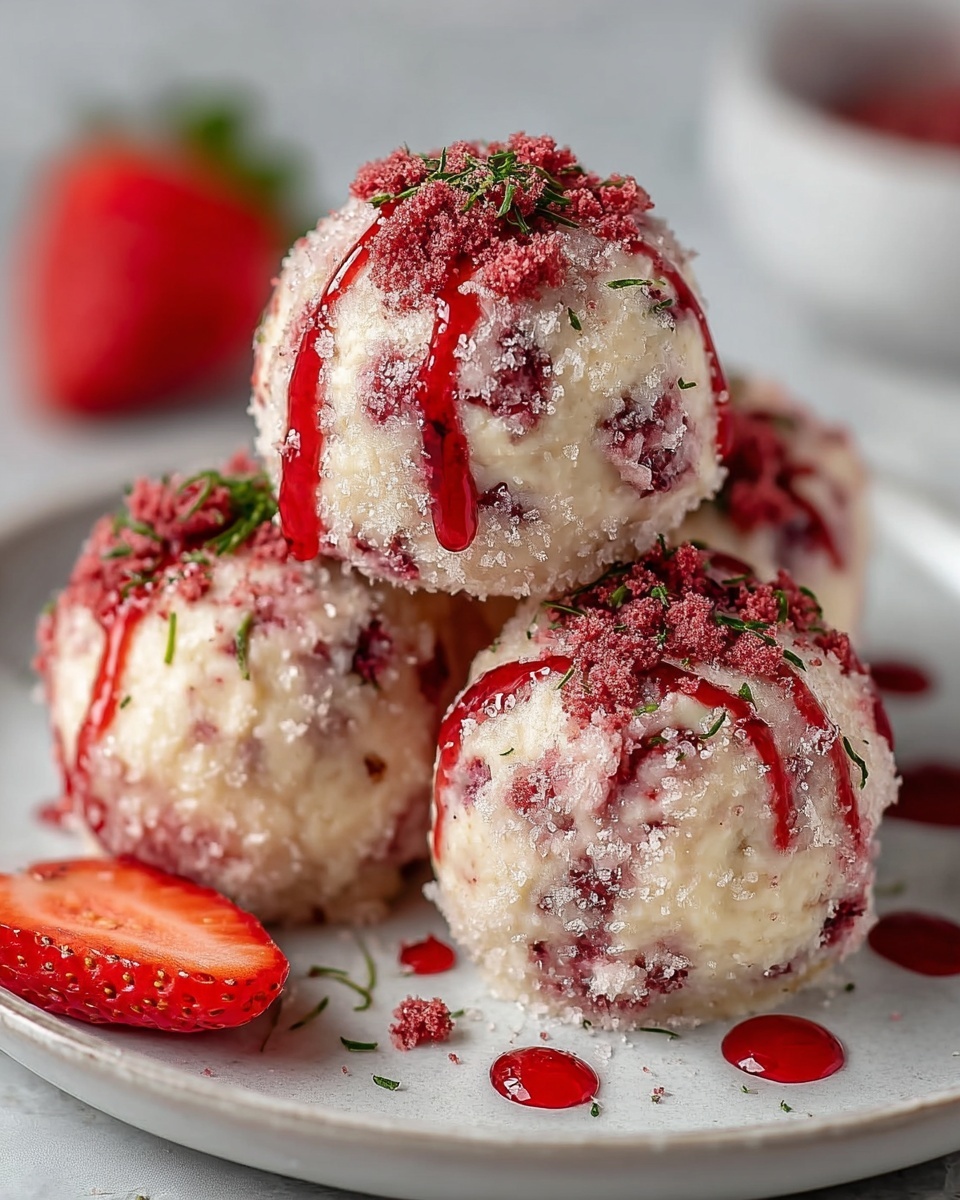
If you’re on the hunt for a snack that perfectly balances indulgence and nutrition, let me introduce you to the magic of Strawberry Cheesecake Protein Balls: The Ultimate Healthy Snack Recipe. These little bites are bursting with the sweet-tart flavor of freeze-dried strawberries melded perfectly with creamy hints of cheesecake, all while packing a serious protein punch. They are insanely easy to make, utterly delicious, and wonderfully satisfying when you need a wholesome boost during a busy day or a post-workout treat.
Ingredients You’ll Need
Only a handful of simple, wholesome ingredients come together to create these delightful Strawberry Cheesecake Protein Balls: The Ultimate Healthy Snack Recipe. Each component is thoughtfully chosen to deliver the ideal texture, flavor, and nutritional benefits that make these balls irresistible.
- Rolled oats: Adds hearty texture and a slow-digesting carb base to keep you full longer.
- Vanilla protein powder (whey or plant-based): Provides muscle-repairing protein and a creamy vanilla flavor.
- Freeze-dried strawberries, crushed: Intense natural strawberry flavor with a vibrant color pop.
- Cream cheese, softened: Brings rich creaminess and that unmistakable cheesecake vibe.
- Honey or maple syrup: Natural sweetness that ties all the ingredients together beautifully.
- Coconut oil, melted: Adds healthy fats and a subtle tropical aroma.
- Unsweetened almond milk: Keeps the mixture moist while remaining light.
- Vanilla extract: Enhances the dessert-like flavor with aromatic depth.
- Pinch of salt: Balances sweetness and amplifies flavors.
- Optional shredded coconut: For rolling, provides an extra layer of texture and a pretty finish.
How to Make Strawberry Cheesecake Protein Balls: The Ultimate Healthy Snack Recipe
Step 1: Combine Dry Ingredients
Start by whisking together the rolled oats, vanilla protein powder, crushed freeze-dried strawberries, and a pinch of salt in a large bowl. This blend sets the foundation for that chewy, fruity bite and perfectly balanced flavor.
Step 2: Soften Cream Cheese
Make sure your cream cheese is softened to room temperature for easy mixing. A quick zap in the microwave for 15-20 seconds does the trick, but be careful not to melt it completely. This step ensures the balls stay creamy without being runny.
Step 3: Add Wet Ingredients
Next, add the softened cream cheese, honey or maple syrup, melted coconut oil, vanilla extract, and unsweetened almond milk into the bowl with your dry ingredients. These wet ingredients bring cohesion and that luscious cheesecake essence to every bite.
Step 4: Mix it All Together
Stir everything well until you have a uniform, slightly sticky dough. This mixture should hold together but not be too wet or dry, creating that perfect texture for rolling.
Step 5: Check Consistency
If the mixture feels too dry and crumbly, add almond milk one tablespoon at a time until it sticks together nicely. Alternatively, if it’s too sticky, sprinkle in more rolled oats or protein powder gradually. Getting this right means your protein balls will have that satisfying, non-messy feel.
Step 6: Chill the Dough
Pop your dough into the refrigerator for 15-20 minutes to firm up. Chilling makes it easier to roll the mixture into consistent balls without anything sticking to your hands.
Step 7: Prepare Your Work Station
If you’re rolling your balls in shredded coconut, pour it into a shallow dish. Also, line a plate or baking sheet with parchment paper—this will be your protein ball’s resting place before chilling.
Step 8: Roll the Balls
Using about a tablespoon of dough at a time, roll the mixture between your palms into smooth, round balls. If your hands get sticky, dampen them slightly with water to keep things clean and easy.
Step 9: Coating (Optional)
For a lovely finishing touch, roll each ball in shredded coconut, pressing gently so the coconut sticks. This adds a pleasant crunch and a hint of tropical flavor that plays beautifully with the strawberry cheesecake notes.
Step 10: Place on Baking Sheet
Arrange your protein balls on the parchment-lined baking sheet, spacing them out so they don’t stick together as they chill.
Step 11: Final Chill
Refrigerate the balls for at least 30 minutes to let the flavors meld and the texture firm up—this final step truly transforms them into the perfect grab-and-go snack.
Step 12: Storing
Once chilled, transfer the protein balls to an airtight container. They will keep fresh in the fridge for up to a week or freeze for up to a month, making them a fabulous make-ahead snack.
How to Serve Strawberry Cheesecake Protein Balls: The Ultimate Healthy Snack Recipe

Garnishes
Sometimes a simple garnish can elevate snack time into a mini celebration. Sprinkle a few extra crushed freeze-dried strawberries on top of each protein ball or lightly dust with cinnamon for a warming twist. A drizzle of melted dark chocolate can also add a decadent touch.
Side Dishes
Pair these protein balls with a refreshing cup of green tea or a chilled smoothie bowl to keep your snack light yet satisfying. They also work wonderfully alongside fresh fruit slices or a small handful of nuts for a balanced mini-meal.
Creative Ways to Present
Make snack time fun by presenting these protein balls in mini cupcake liners or a decorative glass jar. They also make charming additions to lunchboxes or picnic baskets. If you’re feeling festive, arrange them on a platter with edible flowers for a stunning dessert table feature.
Make Ahead and Storage
Storing Leftovers
Keep any extra Strawberry Cheesecake Protein Balls in an airtight container in the refrigerator. They hold their flavor and texture brilliantly for up to a week, perfect for quick snacks or last-minute energy boosters.
Freezing
To extend their shelf life, freeze the protein balls in a single layer on a tray before transferring them into a freezer-safe bag or container. Frozen, they maintain great taste and texture for about a month and can be enjoyed straight from the freezer or thawed overnight.
Reheating
These protein balls are best enjoyed chilled, so no reheating is needed. If you prefer a softer texture, simply let them sit at room temperature for 10-15 minutes before indulging, and they’ll be just right.
FAQs
Can I use other types of protein powder?
Absolutely! Whether you prefer whey, plant-based, or collagen protein powder, feel free to choose whichever suits your dietary needs and taste preferences. Just keep in mind that flavor and texture may vary slightly.
What if I don’t have freeze-dried strawberries?
Freeze-dried strawberries add intense flavor without extra moisture, but you can substitute with finely chopped dried strawberries or fresh strawberries if you reduce the liquid slightly. Just be mindful the texture will change.
Are these protein balls gluten-free?
Yes, as long as you use gluten-free rolled oats and protein powder, this recipe is naturally gluten-free, making it a great option for those with gluten sensitivities.
Can I make these nut-free?
Definitely! Using coconut oil and almond milk keeps the recipe dairy-free and simple, but if allergies are a concern, select seed-based protein powders and use oat milk or rice milk instead of almond milk.
How long will the protein balls stay fresh?
Stored properly in the fridge, these protein balls will stay fresh and tasty for up to one week. Freezing them extends their life to about a month without sacrificing flavor or texture.
Final Thoughts
Getting to know Strawberry Cheesecake Protein Balls: The Ultimate Healthy Snack Recipe means unlocking a new favorite that is as wholesome as it is delicious. These little gems are so easy to make, endlessly customizable, and perfect for whenever you need a quick, nourishing pick-me-up. I wholeheartedly encourage you to whip up a batch and watch how they transform your snack game into something truly special.
Print
Strawberry Cheesecake Protein Balls: The Ultimate Healthy Snack Recipe
- Prep Time: 15 minutes
- Cook Time: 0 minutes
- Total Time: 45 minutes
- Yield: 12-15 protein balls
- Category: Snack
- Method: No-Cook
- Cuisine: American
- Diet: Vegetarian
Description
Strawberry Cheesecake Protein Balls are a delicious and nutritious no-bake snack combining the flavors of creamy cheesecake with fresh strawberries. Packed with protein, oats, and a touch of natural sweetness, these easy-to-make bites are perfect for a healthy energy boost any time of day.
Ingredients
Dry Ingredients
- 1 cup rolled oats
- 1/2 cup vanilla protein powder (whey or plant-based)
- 1/4 cup freeze-dried strawberries, crushed
- Pinch of salt
Wet Ingredients
- 1/4 cup cream cheese, softened
- 2 tablespoons honey or maple syrup
- 1 tablespoon coconut oil, melted
- 1/4 cup unsweetened almond milk (or any milk)
- 1/4 teaspoon vanilla extract
Optional
- 1/4 cup shredded coconut for rolling
Instructions
- Combine Dry Ingredients: In a large mixing bowl, add the rolled oats, vanilla protein powder, crushed freeze-dried strawberries, and a pinch of salt. Whisk to combine evenly.
- Soften Cream Cheese: Ensure the cream cheese is softened for easy mixing. Microwave for 15-20 seconds if necessary, taking care not to melt it.
- Add Wet Ingredients: Add the softened cream cheese, honey or maple syrup, melted coconut oil, vanilla extract, and almond milk to the bowl with the dry ingredients.
- Mix it All Together: Thoroughly mix all ingredients until the mixture is uniform and slightly sticky in texture.
- Check Consistency: If the mixture is too dry, add almond milk one tablespoon at a time. If too wet, add additional rolled oats or protein powder, one tablespoon at a time, until desired consistency is reached.
- Chill the Dough: Place the mixture in the refrigerator and chill for 15-20 minutes to firm up.
- Prepare Work Station: Pour shredded coconut into a shallow dish if using and line a plate or baking sheet with parchment paper.
- Roll the Balls: Scoop about one tablespoon of the mixture at a time and roll between your palms to form smooth, round balls. Dampen your hands if the mixture sticks.
- Coating (Optional): Roll each ball in the shredded coconut until fully coated, pressing gently to adhere.
- Place on Baking Sheet: Arrange the finished protein balls on the lined baking sheet, leaving space between each.
- Final Chill: Refrigerate the protein balls on the baking sheet for at least 30 minutes to set.
- Storing: Transfer the protein balls to an airtight container. Store in the refrigerator for up to one week or freeze for up to one month. Thaw in the refrigerator before consuming.
Notes
- You can substitute maple syrup with honey or your preferred liquid sweetener.
- Use plant-based protein powder to keep this recipe vegan-friendly.
- For a nut-free option, use oat milk instead of almond milk.
- Freeze-dried strawberries provide intense flavor without adding moisture; avoid fresh strawberries.
- Adjust sweetness and texture to taste by modifying honey/maple syrup and milk quantities.
- Wetting your hands helps prevent sticking when rolling the balls.
- These protein balls are great for pre- or post-workout snacks, or as a healthy on-the-go treat.

