
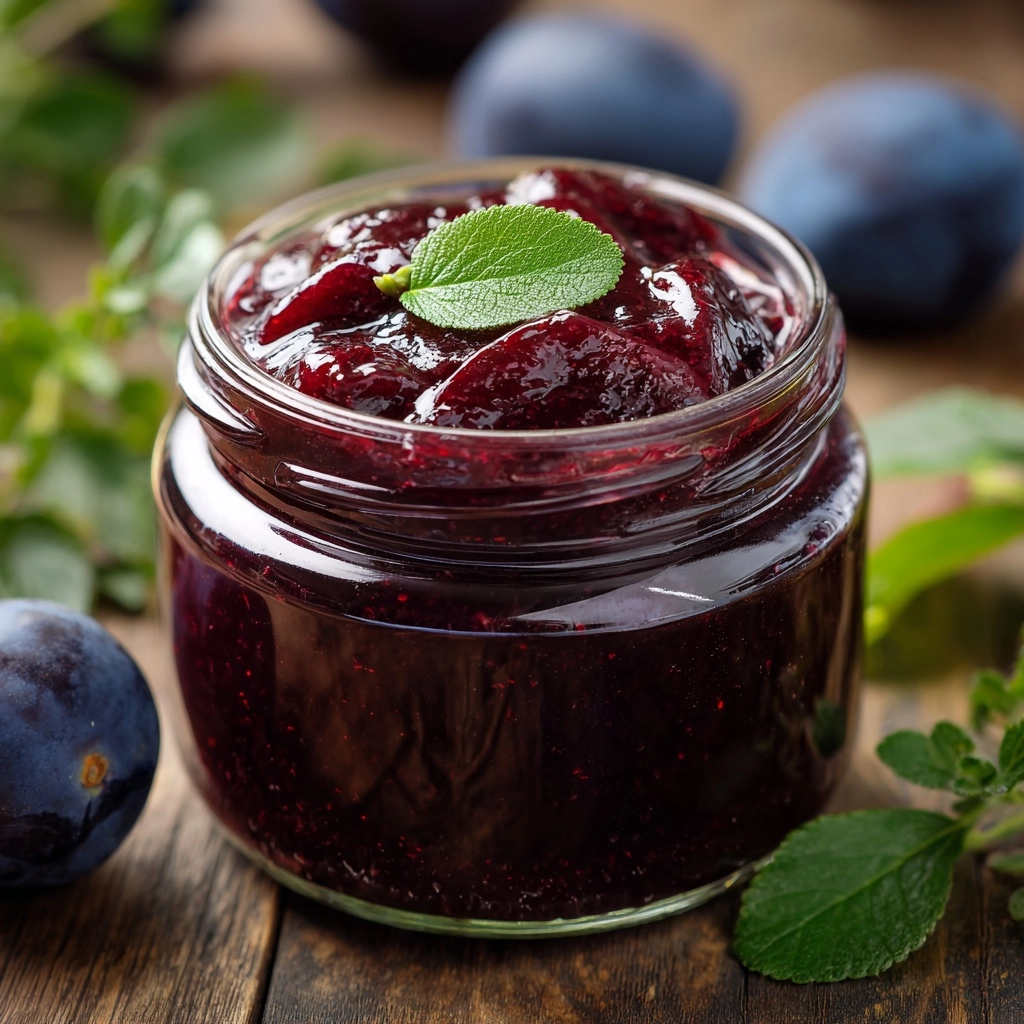
There’s simply nothing like the vibrant, sweet-tart taste of homemade Plum Jam! Bursting with juicy fruit flavor, gorgeous color, and just a hint of brightness from citrus, this is the kind of spread that instantly transforms ordinary toast or yogurt into something special. Whether you’re brand new to jam making or a seasoned pro, this recipe brings out the luscious essence of plums with very little fuss—no pectin or complicated techniques required. You’ll find yourself reaching for this Plum Jam at breakfast, as an afternoon treat, and maybe even as the surprise guest on your next cheese platter.
Ingredients You’ll Need
Ingredients You’ll Need
One of the best things about Plum Jam is how few ingredients you need to create such magical flavor. Each item on this list works together to balance sweetness, acidity, fragrance, and a touch of warmth, making every jar something worth savoring.
- Ripe plums (2 pounds, pitted and chopped): The main event! Use the juiciest, ripest plums you can find for the deepest flavor and beautiful color.
- Granulated sugar (1 1/2 cups): Not only sweetens but helps with preserving and setting the jam. Feel free to adjust slightly if your plums are extra-sweet.
- Lemon juice (2 tablespoons): Adds brightness and balances the natural sweetness, while also helping the jam set.
- Lemon zest (1 teaspoon): Provides a subtle, sunshiny zing that elevates the overall flavor.
- Ground cinnamon (1/4 teaspoon, optional): For a hint of cozy warmth that’s especially lovely with late summer or autumn plums.
How to Make Plum Jam
Step 1: Prep the Plums
Start by washing your plums thoroughly, then pit and chop them. There’s no need to peel—the skins give Plum Jam extra color and lovely flecks throughout. Just be sure to remove all pits to keep the texture nice and smooth.
Step 2: Combine Ingredients in a Saucepan
Grab a large, heavy-bottomed saucepan and add your chopped plums, sugar, lemon juice, lemon zest, and cinnamon if using. Give everything a good stir to ensure the plums are nicely coated and the sugar is evenly distributed.
Step 3: Cook and Simmer the Jam
Place the saucepan over medium heat. Stir regularly as the sugar begins to dissolve and the plums release their juices. Bring the mixture to a gentle boil, then reduce the heat to medium-low. Let it simmer for 25 to 35 minutes, stirring every so often, until the fruit breaks down and things thicken up. For a smoother jam, mash the plums with a potato masher; for a chunkier texture, leave them mostly whole.
Step 4: Check for Doneness
To test if your Plum Jam is ready, spoon a little onto a chilled plate. Wait a few seconds, then gently push it with your finger—if it wrinkles a bit, you’re all set! This trick is kitchen magic for jam makers. If it’s too runny, simmer a little longer and repeat.
Step 5: Jar and Cool
Remove the saucepan from the heat and let the jam rest for 5 minutes to settle any bubbles. Carefully ladle the hot jam into clean jars, seal tightly, and allow them to cool at room temperature. If you plan to keep your Plum Jam for a while, process the jars in a boiling water bath; otherwise, just refrigerate and enjoy within three weeks.
How to Serve Plum Jam
Garnishes
A dollop of Plum Jam is delightful all on its own, but you can take things up a notch with a sprinkle of extra lemon zest, toasted nuts, or a twirl of whipped cream when serving it alongside desserts or yogurt.
Side Dishes
Slather Plum Jam onto warm toast, flaky biscuits, or croissants for a classic breakfast treat. It also shines when paired with soft cheeses, grainy crackers, or as a finishing touch for roasted meats—think pork or chicken with a glossy spoonful on top.
Creative Ways to Present
Transform Plum Jam into thumbprint cookies, swirl it through cheesecake batter, or layer it into trifles. You can even use it as a glaze for grilled peaches or spread over a rustic tart for a quick, elegant dessert.
Make Ahead and Storage
Storing Leftovers
Once opened, keep your Plum Jam stored in the fridge. Sealed tightly in a clean jar, it will stay fresh and flavorful for up to three weeks, ready to be enjoyed anytime cravings strike.
Freezing
If you want to stash away some Plum Jam for later, let it fully cool, then transfer it into freezer-safe containers—just be sure to leave a little space at the top for expansion. Frozen jam keeps for up to six months without compromising its bright flavor or velvety consistency.
Reheating
Jam is usually best enjoyed cold or at room temperature, but if it’s very firm from the fridge or freezer, simply let it sit out until it softens. For a thinner consistency to drizzle over pancakes or desserts, microwave for a few seconds in a heat-proof jar and stir gently.
FAQs
Can I use less sugar in this Plum Jam recipe?
Absolutely! If your plums are extra-ripe or you prefer less sweetness, you can reduce the sugar by up to 1/4 cup without affecting the set too much. Just know that the jam may be a touch softer and should be stored in the fridge or freezer for best results.
Do I need to remove the plum skins?
Nope, keeping the skins on is totally fine and actually recommended—they add beautiful color, subtle texture, and a little depth to the finished jam. If you prefer a super-smooth Plum Jam, you can peel them, but it’s not necessary.
Can I use this recipe with other fruit?
Yes! This recipe works beautifully with other stone fruits like apricots, peaches, or nectarines. Just swap the plums for an equal amount and follow the same process. Each fruit will bring its own unique personality to the jam.
How do I know when the jam is set?
The best way is the “wrinkle test”—place a spoonful of jam on a chilled plate, wait a moment, then push it with your finger. If it wrinkles, you’re good to go. If not, simmer a couple more minutes and test again.
Is this Plum Jam recipe suitable for canning?
Yes, this is a fantastic Plum Jam for canning! Once the jam is hot, transfer to sterilized jars, seal, and process in a boiling water bath for 10 minutes. Properly processed, your jars can last for up to a year in a cool, dark place.
Final Thoughts
Once you taste your own homemade Plum Jam, you might never go back to store-bought again! It’s surprisingly simple and so rewarding to make. Whether you’re preserving the taste of summer or looking for a unique addition to your breakfast routine, this jam is sure to bring joy to your table. Give it a try and share your creations—you’ll be amazed at how a jar of Plum Jam can brighten the day!
Print
Plum Jam Recipe
- Prep Time: 15 minutes
- Cook Time: 30 minutes
- Total Time: 45 minutes
- Yield: About 2 cups
- Category: Condiment
- Method: Stovetop
- Cuisine: American
- Diet: Vegan
Description
Learn how to make delicious homemade plum jam with this easy recipe. With just a few simple ingredients, you can create a flavorful jam perfect for spreading on toast or pairing with cheese.
Ingredients
Ingredients:
- 2 pounds ripe plums (pitted and chopped)
- 1 1/2 cups granulated sugar
- 2 tablespoons lemon juice
- 1 teaspoon lemon zest
- 1/4 teaspoon ground cinnamon (optional)
Instructions
- Place the chopped plums in a large saucepan over medium heat. Add the sugar, lemon juice, lemon zest, and cinnamon if using. Stir well and bring the mixture to a gentle boil, stirring frequently to prevent sticking.
- Once boiling, reduce the heat to medium-low and simmer for 25–35 minutes, stirring occasionally, until the fruit breaks down and the mixture thickens.
- You can mash the plums slightly with a spoon or potato masher for a smoother texture, or leave chunks for a rustic feel.
- To test if the jam is ready, spoon a small amount onto a chilled plate — if it wrinkles slightly when pushed, it’s done.
- Remove from heat and let it sit for 5 minutes.
- Transfer the jam into clean jars, seal tightly, and cool at room temperature.
- Refrigerate and use within 3 weeks, or process in a water bath for long-term storage.
Notes
- If your plums are very sweet, reduce the sugar slightly.
- You can leave the skins on for extra texture and color.
- This jam pairs wonderfully with toast, cheese boards, or yogurt.
Nutrition
- Serving Size: 1 tablespoon
- Calories: 40
- Sugar: 9g
- Sodium: 0mg
- Fat: 0g
- Saturated Fat: 0g
- Unsaturated Fat: 0g
- Trans Fat: 0g
- Carbohydrates: 10g
- Fiber: 0g
- Protein: 0g
- Cholesterol: 0mg

