
If you’ve ever dreamed of capturing the nostalgic magic of cafeteria favorites with a homemade twist, then this Peanut Butter Lunch Lady Cookie Bars Recipe is exactly what you need. These bars combine the rich, creamy taste of peanut butter with the wholesome chewiness of oats, all topped with a luscious peanut butter frosting that feels like a warm hug in every bite. Whether you’re packing lunchboxes, craving a comforting dessert, or just want to treat yourself, these cookie bars bring that classic, down-to-earth flavor and energy in a way that’s irresistibly delicious and easy to whip up anytime.

Ingredients You’ll Need
Gathering just the right ingredients is what makes this Peanut Butter Lunch Lady Cookie Bars Recipe so special. Each item plays a crucial role, from texture to flavor depth and that perfect golden color. These pantry staples come together simply to create a crowd-pleaser that feels both homemade and nostalgic.
- 1 cup unsalted butter (softened): Adds richness and helps create a tender crumb.
- 1 cup creamy peanut butter: The star flavor that delivers that classic, nutty warmth.
- 1 cup granulated sugar: Brings sweetness and aids in light texture.
- 1 cup packed light brown sugar: Offers moisture and a hint of caramel flavor.
- 2 large eggs: Bind everything together and give structure.
- 1 teaspoon vanilla extract: Enhances all the flavors with a lovely aromatic note.
- 2 cups all-purpose flour: The base that holds the bars firm yet tender.
- 1 teaspoon baking soda: Helps the bars rise and become perfectly light.
- 1/2 teaspoon salt: Balances sweetness and deepens the flavor.
- 1 1/2 cups quick oats: Provides texture and wholesome chewiness.
- Frosting ingredients: 1/2 cup creamy peanut butter, 1/4 cup unsalted butter, 1/4 cup milk, 1 teaspoon vanilla extract, and 2 to 2 1/2 cups powdered sugar – these create the icing that ties it all together with creamy, dreamy peanut buttery goodness.
How to Make Peanut Butter Lunch Lady Cookie Bars Recipe
Step 1: Prepare Your Pan and Oven
Start by preheating your oven to 350°F (175°C). Grease a 9×13-inch baking dish or line it with parchment paper to make lifting the cookie bars out a breeze later.
Step 2: Cream the Butter, Peanut Butter, and Sugars
In a large mixing bowl, combine the softened unsalted butter, creamy peanut butter, granulated sugar, and light brown sugar. Beat them together until the mixture is smooth and fluffy — this helps incorporate air for a lighter texture and blends those classic peanut butter flavors beautifully.
Step 3: Add Eggs and Vanilla
Crack in the eggs one at a time, mixing well after each addition. Then, add the vanilla extract and give it another good stir. This is where the dough starts to come alive with binding power and fragrant warmth.
Step 4: Combine Dry Ingredients Separately
In a separate bowl, whisk together the all-purpose flour, baking soda, and salt. This ensures even distribution so your bars rise nicely and have perfect texture.
Step 5: Mix Dry Ingredients into Wet Mixture
Gradually add your dry ingredients into the wet peanut butter mixture, stirring gently just until combined. Avoid overmixing to keep your bars tender.
Step 6: Stir in the Quick Oats
Folding in the quick oats adds that wonderful chewy texture and wholesome appeal that defines this recipe. Make sure they’re evenly distributed throughout the batter.
Step 7: Bake the Bars
Spread the cookie dough evenly in your prepared pan, smoothing the top for an even bake. Pop it in the oven and bake for 22 to 25 minutes — you’re looking for golden edges and a set center, not a wobbly one. Let the bars cool in the pan for about 10 minutes before adding frosting.
Step 8: Prepare the Frosting
While your bars take a little breather, melt the frosting ingredients — peanut butter and butter — together in a saucepan over medium-low heat, stirring until smooth. Take it off the heat and whisk in the milk and vanilla extract. Then, gradually add powdered sugar until you’ve reached a creamy, spreadable consistency that’s just right for topping.
Step 9: Frost and Cool Completely
Spread the frosting over your warm bars gently so it melts into the surface just a touch, then allow the entire pan to cool completely before slicing into squares.
How to Serve Peanut Butter Lunch Lady Cookie Bars Recipe

Garnishes
A simple dusting of chopped peanuts or a sprinkle of mini chocolate chips on top before the frosting sets adds a fun crunch and a playful pop of texture that perfectly complements the soft bars.
Side Dishes
These bars are fantastic on their own, but if you’re creating a lunch spread, pair them with fresh fruit like apple slices or a glass of cold milk to balance sweetness and add refreshing contrast.
Creative Ways to Present
For special occasions or school events, cut the bars into fun shapes with cookie cutters or serve on colorful plates to brighten the table. Wrapping individual bars in parchment paper tied with twine also makes for charming gifts or lunchbox surprises.
Make Ahead and Storage
Storing Leftovers
Once frosted and cooled, store the Peanut Butter Lunch Lady Cookie Bars in an airtight container at room temperature. They’ll stay fresh and chewy for up to 4 days—perfect for grabbing a quick, indulgent snack.
Freezing
You can freeze these bars uncut by wrapping them tightly in plastic wrap then foil. They keep well frozen for up to 3 months. Thaw them overnight in the fridge before serving to retain texture and flavor.
Reheating
If you crave a warm bar, just microwave an individual piece for about 10 seconds. The frosting softens slightly, making the peanut butter flavor even more heavenly and comforting.
FAQs
Can I use crunchy peanut butter instead of creamy?
Absolutely! Using crunchy peanut butter in either the dough or frosting adds delightful texture and extra peanutty crunch, giving the bars a fun variation.
Can I substitute the quick oats with rolled oats?
Quick oats work best as they blend smoothly without overpowering the texture, but you can use rolled oats if you prefer a heartier bite. Just expect a chewier, more rustic bar.
Is it possible to make these bars gluten-free?
Yes, you can substitute the all-purpose flour with a gluten-free baking blend that measures cup-for-cup. Just ensure your baking soda and oats are certified gluten-free as well.
How long should I let the bars cool before frosting?
Let the bars cool for about 10 minutes so they’re warm but not hot. This ensures the frosting melts slightly on top without sliding off, creating that perfect finish.
Can I double the recipe for a larger batch?
Definitely! Just use a larger baking pan, or split the batter into two pans. Keep the baking time close but watch for doneness, as larger pans may need a few extra minutes.
Final Thoughts
Making this Peanut Butter Lunch Lady Cookie Bars Recipe feels like a warm walk down memory lane, wrapped in the comfort of homemade peanut buttery goodness. Whether you’re sharing with friends, packing a nostalgic treat for your family, or simply indulging your own sweet tooth, these bars hit just the right note of chewy, creamy, and downright satisfying. Give this recipe a try, and I promise, these cookie bars will soon hold a permanent place in your heart and kitchen.
Print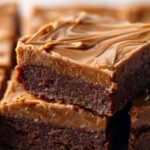
Peanut Butter Lunch Lady Cookie Bars Recipe
- Prep Time: 15 minutes
- Cook Time: 25 minutes
- Total Time: 40 minutes
- Yield: 24 bars
- Category: Dessert
- Method: Baking
- Cuisine: American
- Diet: Vegetarian
Description
These Peanut Butter Lunch Lady Cookie Bars are a nostalgic American dessert combining the rich, creamy flavors of peanut butter with chewy oats and a soft, sweet frosting. Perfect for school lunches, bake sales, or potlucks, these bars are easy to make and have a delightful balance of texture and taste.
Ingredients
Cookie Bars
- 1 cup unsalted butter (softened)
- 1 cup creamy peanut butter
- 1 cup granulated sugar
- 1 cup packed light brown sugar
- 2 large eggs
- 1 teaspoon vanilla extract
- 2 cups all-purpose flour
- 1 teaspoon baking soda
- 1/2 teaspoon salt
- 1 1/2 cups quick oats
Frosting
- 1/2 cup creamy peanut butter
- 1/4 cup unsalted butter
- 1/4 cup milk
- 1 teaspoon vanilla extract
- 2 to 2 1/2 cups powdered sugar
Instructions
- Preheat and Prepare: Preheat your oven to 350°F (175°C). Grease or line a 9×13-inch baking dish with parchment paper to ensure easy removal of the bars after baking.
- Cream Wet Ingredients: In a large bowl, cream together the softened unsalted butter, creamy peanut butter, granulated sugar, and light brown sugar until the mixture is smooth and fluffy, creating a rich base for the cookie bars.
- Add Eggs and Vanilla: Beat in the two large eggs and vanilla extract thoroughly to combine, which helps to bind the ingredients and add flavor.
- Mix Dry Ingredients: In a separate bowl, whisk together all-purpose flour, baking soda, and salt. This ensures even distribution of the leavening agent and seasoning.
- Combine Dry and Wet: Gradually add the dry ingredients into the wet mixture, stirring until just combined. Be careful not to overmix to keep the bars tender.
- Incorporate Oats: Stir in the quick oats until fully mixed in, adding chewiness and texture to the bars.
- Bake: Spread the dough evenly into the prepared 9×13-inch pan. Bake for 22 to 25 minutes, or until the edges are golden brown and the center is set, indicating the bars are cooked through.
- Cool Before Frosting: Remove the bars from the oven and let them cool for about 10 minutes to firm up slightly but remain warm enough for the frosting to melt smoothly.
- Prepare Frosting: In a saucepan over medium-low heat, melt the peanut butter and unsalted butter together, stirring until smooth. Remove from heat and whisk in the milk and vanilla extract.
- Add Powdered Sugar: Gradually stir in 2 to 2 1/2 cups powdered sugar until the frosting reaches a smooth, spreadable consistency suitable for topping the bars.
- Frost Bars: Spread the frosting evenly over the slightly warm cookie bars, allowing it to meld with the bars for a creamy finish.
- Final Cooling and Serve: Let the frosting set by cooling completely before slicing into 24 squares. This ensures clean cuts and perfect texture for serving.
Notes
- For added texture, substitute half of the creamy peanut butter in the dough with crunchy peanut butter.
- These bars freeze well, making them convenient for meal prep and future enjoyment.
- Ideal for school lunches, bake sales, and potluck events due to their handheld nature and crowd-pleasing flavor.

