
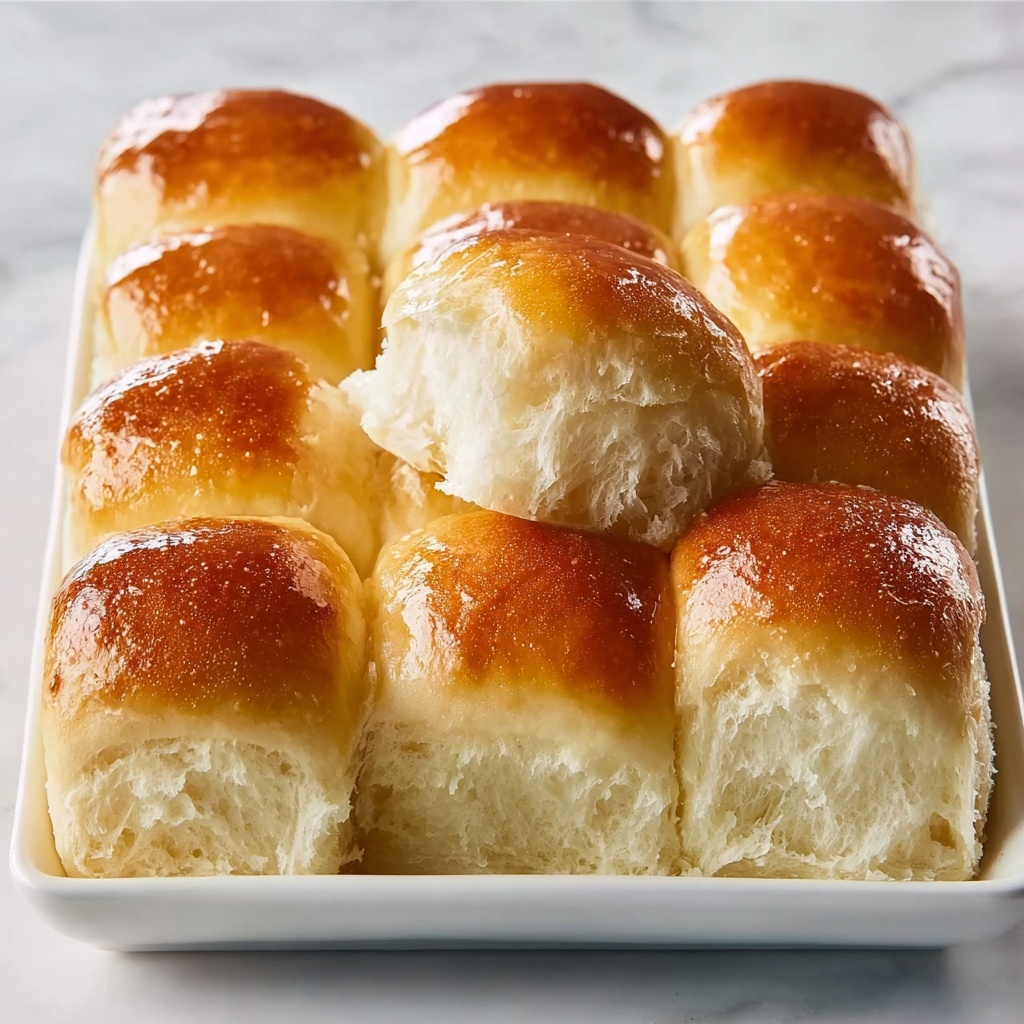
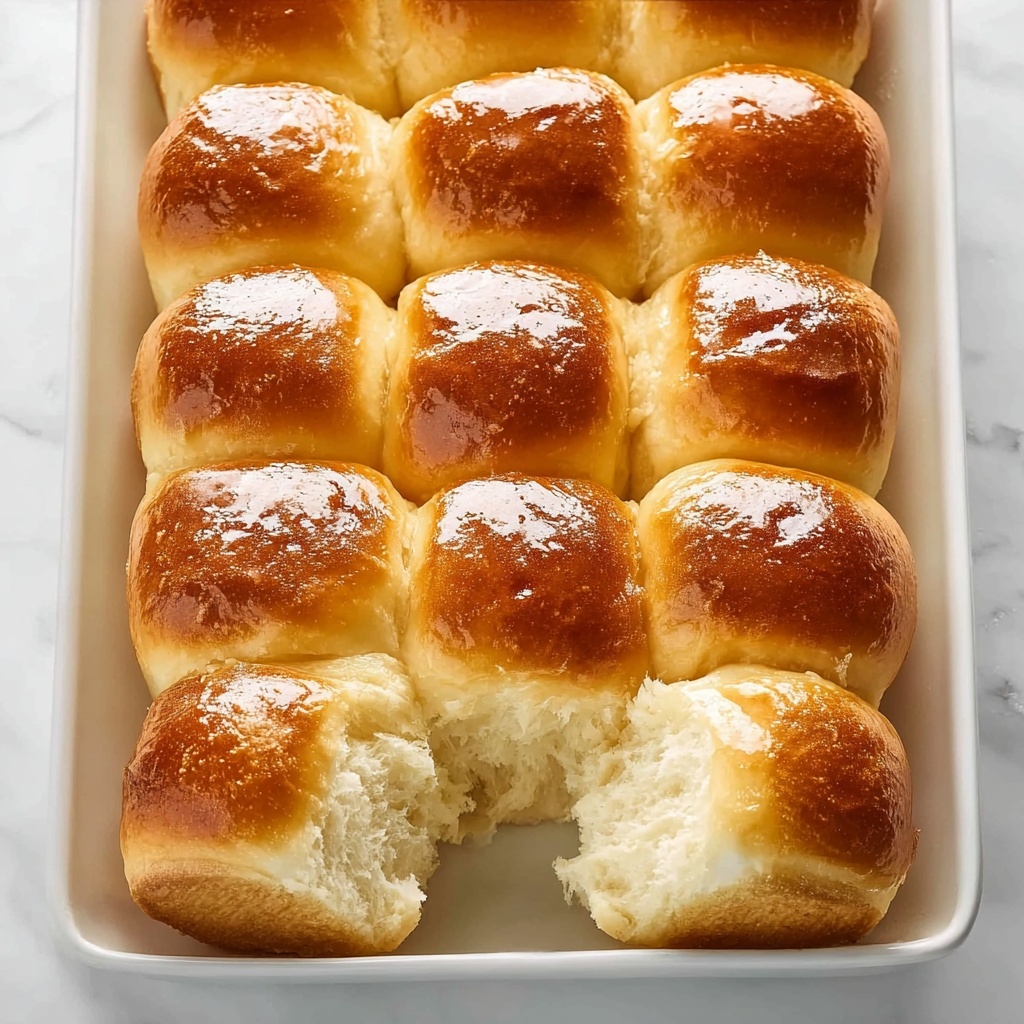
There is something truly magical about homemade rolls, and this Fluffy and Soft Dinner Rolls Recipe captures that warm, comforting feeling perfectly. Imagine biting into a pillowy-soft, golden-brown roll that melts in your mouth, with just the right touch of buttery goodness on top. These rolls are not only a delight to eat but also surprisingly simple to make, making them a perfect addition to any meal or special occasion.
Ingredients You’ll Need
Gathering the right ingredients is the key to achieving those soft, airy dinner rolls that everyone will love. Each element plays a vital role—from the yeast that gives the dough its rise, to the melted butter that adds richness and tenderness.
- All-purpose flour (3 1/2 cups): The foundation of the dough, providing structure and chewiness.
- Active dry yeast (1 packet or 2 1/4 teaspoons): This magical ingredient activates the rising process to make your rolls light and fluffy.
- Warm milk (1 cup at 110°F/43°C): Feeds the yeast and keeps the dough moist for a soft crumb.
- Granulated sugar (1/4 cup): Adds a touch of sweetness to balance the buttery flavor and aid yeast activation.
- Unsalted butter, melted (1/4 cup + 2 tablespoons): Provides richness inside the dough and a shiny, flavorful coating after baking.
- Large egg (1): Helps to bind the dough and adds tenderness.
- Salt (1 teaspoon): Balances flavor and controls yeast activity for perfect rise and taste.
How to Make Fluffy and Soft Dinner Rolls Recipe
Step 1: Activate the Yeast
Start by combining warm milk, sugar, and yeast in a small bowl. Let this mixture sit for about 5 to 10 minutes until it becomes foamy and bubbly. This indicates the yeast is active and ready to work its magic, laying the foundation for those irresistible fluffy rolls.
Step 2: Mix the Dough
In a large bowl, whisk together the flour and salt, ensuring they’re well combined. Pour in the yeast mixture, melted butter, and the egg. Stir everything together until you get a shaggy dough that looks just a bit rough but promising. This is where your hands will soon bring it all together.
Step 3: Knead Until Smooth
Turn the dough onto a floured surface and knead for about 8 to 10 minutes. You’re aiming for a smooth, elastic texture that springs back when poked. If you have a stand mixer, a 5 to 6-minute session with the dough hook works wonderfully and saves you some elbow grease.
Step 4: Let the Dough Rise
Place your dough in a lightly greased bowl, cover it with a clean towel or plastic wrap, and set it in a warm spot. Let it rise for 1 to 1.5 hours until it doubles in size. This slow rise develops flavor and makes the dough incredibly soft and airy.
Step 5: Shape the Rolls
Punch down the risen dough to release the air, then divide it into 12 to 15 equal pieces. Shape each piece gently into a smooth ball and arrange them snugly in a greased 9×13-inch baking dish. Don’t worry about a little space between them—the second rise will fix that.
Step 6: Second Rise
Cover the shaped rolls and let them rest for another 30 to 45 minutes. Watching them puff up as they get ready to bake is like waiting for a delicious surprise to unfold.
Step 7: Bake to Perfection
Preheat your oven to 375°F (190°C). Bake the rolls for 18 to 22 minutes until the tops are nicely golden brown. Your kitchen will start filling with that irresistible baking bread aroma that makes any day better.
Step 8: Brush with Butter and Serve
Right after pulling the rolls from the oven, brush them generously with melted butter to give them a shiny, rich finish and keep them soft. Serve them warm for the ultimate fluffy and soft dinner rolls experience.
How to Serve Fluffy and Soft Dinner Rolls Recipe
Garnishes
While the rolls are perfect on their own, a sprinkle of flaky sea salt or a dusting of fresh herbs like rosemary or thyme can add a delightful twist. A light spread of honey butter is also a crowd-pleaser that takes these rolls up a notch at the table.
Side Dishes
Fluffy and Soft Dinner Rolls Recipe pairs wonderfully with soups, stews, or hearty salads. They’re also fantastic as the bread base for sliders, or alongside a rich pasta dish to soak up every last bit of sauce.
Creative Ways to Present
Try serving these rolls in a warm bread basket lined with a colorful napkin for a rustic look. For gatherings, slice them in half and use as sliders with assorted fillings, or even turn them into mini sandwiches with jam or cheese for a fun appetizer.
Make Ahead and Storage
Storing Leftovers
Once cooled, keep leftover rolls in an airtight container or resealable bag to maintain their softness. Stored at room temperature, they stay fresh for 2 to 3 days—perfect for enjoying a quick snack or adding to meals throughout the week.
Freezing
If you want to make these rolls ahead of time, freezing is your friend. Wrap the cooled rolls tightly in plastic wrap and place them in a freezer-safe bag. They’ll keep well for up to 2 months without losing that tender texture you love.
Reheating
To bring frozen or leftover rolls back to life, warm them gently in the oven at 300°F (150°C) for about 10 minutes. You can also microwave them briefly, but the oven helps maintain the fluffy texture and that perfect golden crust.
FAQs
Can I use whole wheat flour instead of all-purpose flour?
Yes, but keep in mind that whole wheat flour can make the rolls a bit denser. For best results, substitute only half the all-purpose flour with whole wheat to maintain softness while adding a nutty flavor.
What if my yeast doesn’t foam during activation?
This usually means the yeast is either expired or the milk is not at the right temperature. Use fresh yeast and ensure your milk is warm, not hot, to properly activate the yeast for the best rise.
Can I make these rolls dairy-free?
Absolutely! Swap the milk for a plant-based alternative such as almond or oat milk, and use dairy-free margarine or coconut oil instead of butter. The texture might vary slightly, but they’ll still be delicious.
How do I make rolls with a shiny, golden crust?
Brushing the rolls with melted butter immediately after baking gives them a lovely shine and enhances the golden color. For an even glossier finish, you can brush them with egg wash before baking.
Is it necessary to let the dough rise twice?
Yes, the first rise develops the dough’s flavor and structure, while the second rise after shaping makes the rolls wonderfully soft and fluffy by allowing them to puff up before baking.
Final Thoughts
Making your own dinner rolls from scratch is such a rewarding experience, especially when the result is as delightful as this Fluffy and Soft Dinner Rolls Recipe. There’s nothing quite like the smell of fresh rolls wafting through the kitchen and sharing them warm with loved ones. Don’t hesitate to give this recipe a try—once you do, these rolls will surely become a beloved staple at your dining table.
Print
Fluffy and Soft Dinner Rolls Recipe
- Prep Time: 15 minutes
- Cook Time: 20 minutes
- Total Time: 1 hour 55 minutes
- Yield: 12 servings
- Category: Dinner Rolls
- Method: Baking
- Cuisine: American
- Diet: Vegetarian
Description
These fluffy and soft dinner rolls are a perfect homemade addition to any meal. With a tender crumb and buttery crust, they are simple to make using basic ingredients like flour, yeast, and milk. Whether for a holiday feast or a casual dinner, these rolls will delight with their light texture and rich flavor.
Ingredients
For the Dough
- 3 1/2 cups all-purpose flour (plus more for kneading)
- 1 packet (2 1/4 teaspoons) active dry yeast
- 1 cup warm milk (110°F or 43°C)
- 1/4 cup granulated sugar
- 1/4 cup unsalted butter, melted
- 1 large egg
- 1 teaspoon salt
For Brushing
- 2 tablespoons butter, melted (for brushing)
Instructions
- Activate Yeast: In a small bowl, combine warm milk, sugar, and active dry yeast. Let it sit for 5 to 10 minutes until the mixture becomes foamy, indicating the yeast is active and ready.
- Mix Dough: In a large bowl, combine the all-purpose flour and salt. Add the foamy yeast mixture, the beaten egg, and melted butter. Stir everything until a shaggy dough starts to form.
- Knead: Transfer the dough onto a floured surface and knead it for 8 to 10 minutes until it becomes smooth and elastic. Alternatively, use a stand mixer fitted with a dough hook and knead on medium speed for 5 to 6 minutes.
- First Rise: Place the kneaded dough in a lightly greased bowl, cover it with a clean kitchen towel or plastic wrap, and let it rise in a warm place for 1 to 1.5 hours until it doubles in size.
- Shape Rolls: Punch down the risen dough to release the air. Divide it into 12 to 15 equal pieces. Shape each piece into a smooth ball and arrange them evenly in a greased 9×13-inch baking dish.
- Second Rise: Cover the shaped rolls and let them rise again for 30 to 45 minutes in a warm spot until they become puffy and nearly double in size.
- Bake: Preheat your oven to 375°F (190°C). Bake the rolls for 18 to 22 minutes until the tops turn a beautiful golden brown.
- Brush with Butter: Remove the hot rolls from the oven and immediately brush the tops with melted butter to add a rich, glossy finish. Serve warm for best taste.
Notes
- Use warm milk at about 110°F (43°C) to properly activate the yeast without killing it.
- You can substitute all-purpose flour with bread flour for a chewier texture.
- For softer crust, cover the rolls with a damp cloth right after baking.
- Store leftovers in an airtight container to maintain freshness for up to 2 days.
- Reheat rolls gently in the oven or microwave before serving.


