
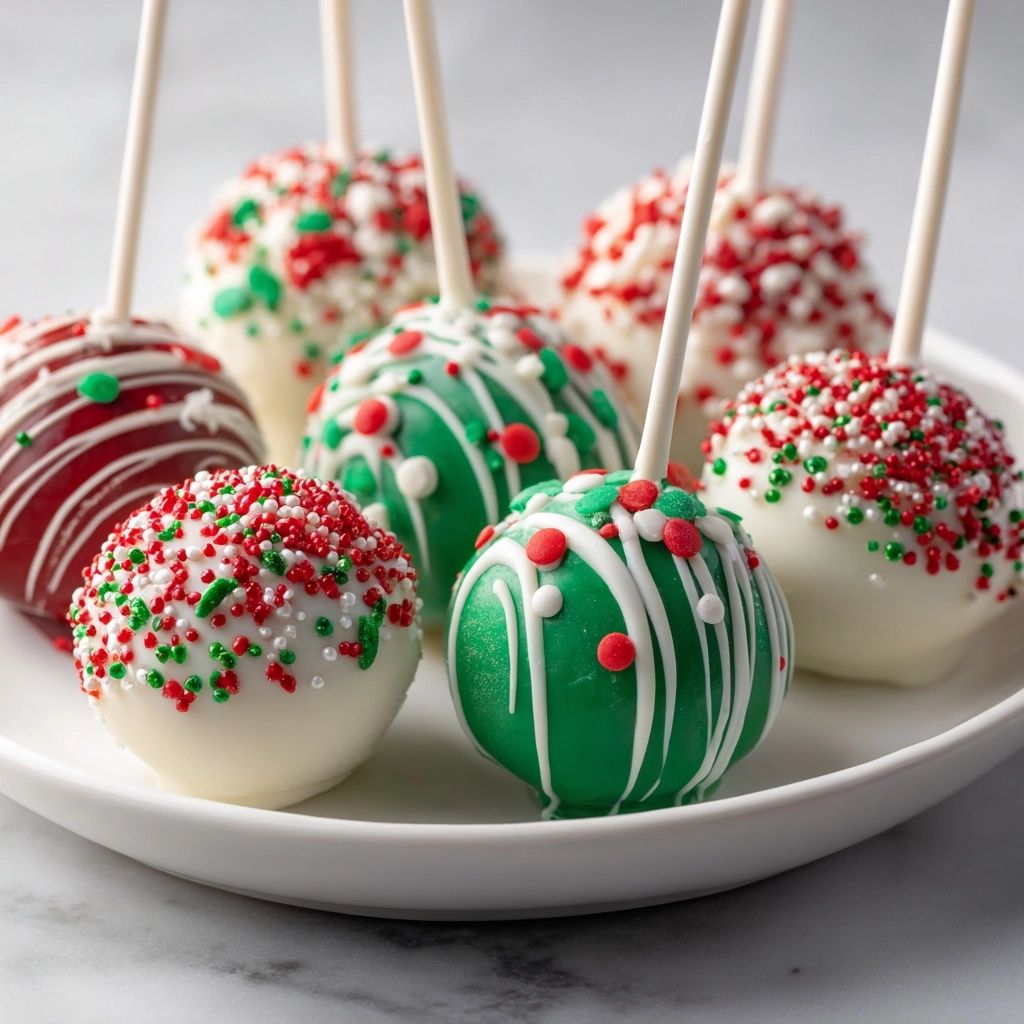
If there’s one treat guaranteed to make every holiday gathering a little more magical, it’s these adorable Christmas Cake Pops. Imagine a bite-sized morsel of moist cake, rolled into perfect balls, dipped in shimmering candy melts, and topped with festive sprinkles—every bite delivers sweetness, cheer, and pure holiday spirit. Whether you’re searching for a crowd-pleasing party treat or a hands-on family kitchen project, Christmas Cake Pops transform simple ingredients into dazzling, delicious fun for all ages.

Ingredients You’ll Need
Building beautiful Christmas Cake Pops doesn’t require a mile-long shopping list—in fact, you only need a handful of staple ingredients. Each one plays a unique role, bringing flavor, structure, color, and endless decorating possibilities to your holiday treat table.
- Boxed cake mix: Any flavor is fair game—chocolate, vanilla, or even red velvet! Make it according to the package for a guaranteed moist and tasty base.
- Frosting (1 cup): Buttercream, cream cheese, or store-bought all work wonders, binding cake crumbs into a scoopable, doughy mixture.
- White candy melts (12 ounces): These are your snowy canvas for decorating and drizzling, adding a sweet shell that sets quickly.
- Red or green candy melts (12 ounces): Bring the vibrant hues of Christmas! Use as a main color or an accent drizzle for extra holiday flair.
- Holiday sprinkles: Let your creativity shine with stars, snowflakes, or classic red and green jimmies that catch both the eye and the taste buds.
- Lollipop sticks or paper straws: Essential for the pop! They make your creations easy to hold, dip, and display.
How to Make Christmas Cake Pops
Step 1: Bake the Cake
Start by preparing your chosen boxed cake mix according to the instructions on the package. Once baked to golden perfection, let the cake cool completely on a wire rack. This step ensures your cake pops have the light texture you’re after, and it keeps the frosting from melting too early.
Step 2: Crumble and Mix
After the cake’s cooled, break it into large chunks and place them in a big mixing bowl. Use your hands or a fork to crumble the cake until you have fine, uniform crumbs. Add 1 cup of your favorite frosting and mix everything together—first with a spoon, then with your hands—until the mixture is thick and dough-like, holding its shape when pressed.
Step 3: Shape the Pops
Scoop out tablespoon-sized portions (a cookie scoop makes this quick and tidy!) and roll each one between your palms to create perfectly round balls. Place them on a parchment-lined baking sheet, ensuring they don’t touch. Chill the cake balls in the refrigerator for 1 hour or in the freezer for 20 minutes so they’re firm enough to dip without crumbling.
Step 4: Prepare the Candy Melts
While the cake balls chill, melt your white and colored candy melts in separate microwave-safe bowls. Heat in 30-second intervals, stirring between each, until silky smooth. This is where the Christmas colors come out in full force—white for a snowy finish, and red or green for a pop of holiday spirit.
Step 5: Insert the Sticks
Take each lollipop stick and dip just the tip in melted candy, then gently insert it about halfway into each chilled cake ball. This trick secures the stick inside, helping the cake pop stay put during dipping and decorating. Place them back in the fridge for a few minutes to set.
Step 6: Dip and Decorate
Carefully dip each cake pop straight down into your melted candy, ensuring it’s fully coated. Let the excess drip off by gently tapping the stick against the edge of the bowl. Before the coating dries, shower each pop with sprinkles or drizzle with a contrasting hue of melted candy for dazzling Christmas Cake Pops. Stand the finished pops upright in a styrofoam block or cake pop stand and let them dry completely.
How to Serve Christmas Cake Pops
Garnishes
Holiday-themed sprinkles are a must for authentic Christmas Cake Pops! Get creative with snowflake-shaped confetti, metallic stars, or a peppermint swirl of colored candy drizzle. For a touch of whimsy, try edible glitter or tiny sugar pearls.
Side Dishes
Pair your Christmas Cake Pops with mugs of hot chocolate topped with whipped cream, cinnamon-sprinkled lattes, or a platter of festive cookies for an indulgent holiday dessert bar. For a lighter spread, arrange them alongside a fresh fruit salad—the sweet pops complement juicy berries and grapes especially well.
Creative Ways to Present
Pops look stunning arranged in a festive styrofoam block, nestled in jars filled with sugar “snow,” or poked into a decorated floral foam wreath as a centerpiece. Wrap each pop in cellophane with a pretty ribbon for irresistible stocking stuffers or party favors guests can take home.
Make Ahead and Storage
Storing Leftovers
Any extra Christmas Cake Pops will keep beautifully for three to four days at room temperature in an airtight container. On particularly warm or humid days, you can store them in the fridge to prevent the candy shell from softening, but be sure to let them come to room temperature before serving for the best flavor and texture.
Freezing
For serious holiday planners, the cake balls (before dipping) can be made and frozen up to two months in advance. Let them thaw in the fridge overnight, then dip and decorate as usual. Finished, dipped cake pops can also be frozen; just wrap well and thaw at room temperature for about 30 minutes before serving.
Reheating
While you don’t need to reheat cake pops (they’re best enjoyed at room temperature), if you’ve frozen them, always allow time for a gentle thaw to bring out their signature softness. Just transfer to the counter and let them sit for a bit—never microwave, or the candy coating can crack or melt.
FAQs
How do I prevent the cake pops from falling apart when dipping?
The key is to chill the shaped cake balls until they’re very firm. Dipping the stick in melted candy before inserting also acts like edible glue, and make sure to work gently when coating in candy melts.
Can I use homemade cake and frosting instead of boxed?
Absolutely! Feel free to bake your favorite cake recipe or make your own frosting for extra flavor. Just be sure the cake is cooled and your frosting isn’t too runny to keep the texture just right.
What kind of sprinkles work best for Christmas Cake Pops?
Go for holiday-specific sprinkles—think red and green jimmies, silver dragées, snowflakes, and candy cane bits. Avoid extra-large decorations, which can be heavy and may slide off before the candy melts set.
How long does it take for the coating to set?
The candy coating sets quickly at room temperature, usually within 15–30 minutes. If you’re in a hurry, pop the decorated pops in the fridge for 10 minutes for an even firmer shell.
Can I make other holiday shapes with this recipe?
Definitely! Use your hands to sculpt the mixture into trees, stars, or ornaments before dipping and decorating as usual. Just remember, simple round cake pops are the easiest to dip and coat evenly.
Final Thoughts
If you’re looking for a guaranteed crowd-pleaser with a major dose of holiday cheer, Christmas Cake Pops are the way to go. They’re fun to make, even more fun to decorate, and always the first to disappear from any dessert table. Try them once, and you’ll find yourself making them a yearly tradition—happy baking and happy holidays!
Print
Christmas Cake Pops Recipe
- Prep Time: 45 minutes
- Cook Time: 30 minutes (baking cake)
- Total Time: 1 hour 15 minutes plus chilling
- Yield: 30 cake pops
- Category: Dessert, Holiday Treats
- Method: Baking, Mixing, Dipping
- Cuisine: American
- Diet: Vegetarian
Description
These Christmas Cake Pops are a festive and delicious treat that are perfect for holiday parties or as edible gifts. Made with cake crumbs mixed with frosting, coated in colorful candy melts, and decorated with sprinkles, these pops are sure to be a hit with everyone.
Ingredients
Cake Pops:
- 1 box cake mix (any flavor), plus ingredients listed on the package
- 1 cup frosting (buttercream, cream cheese, or store-bought)
- 12 ounces white candy melts
- 12 ounces red or green candy melts
- Holiday sprinkles
- Lollipop sticks or paper straws
Instructions
- Bake Cake: Prepare and bake the cake according to package directions. Let it cool completely.
- Make Cake Balls: Crumble the cooled cake into fine crumbs in a large bowl. Add frosting and mix until dough-like consistency forms. Roll into balls.
- Chill Cake Balls: Place the cake balls on a baking sheet lined with parchment paper. Refrigerate for 1 hour or freeze for 20 minutes until firm.
- Melt Candy Melts: Melt white and colored candy melts separately. Dip lollipop sticks into melted candy and insert into cake balls.
- Dip Cake Pops: Dip cake pops into melted candy, allowing excess to drip off. Decorate with sprinkles.
- Dry Cake Pops: Place the decorated pops upright in a styrofoam block or cake pop stand to dry completely.
Notes
- For extra festive flair, drizzle contrasting colored candy melts over the coated pops.
- You can prepare cake balls ahead of time and freeze them for up to 2 months; dip and decorate when ready to serve.
Nutrition
- Serving Size: 1 cake pop
- Calories: 160
- Sugar: 18 g
- Sodium: 120 mg
- Fat: 7 g
- Saturated Fat: 4 g
- Unsaturated Fat: 2 g
- Trans Fat: 0 g
- Carbohydrates: 24 g
- Fiber: 0 g
- Protein: 2 g
- Cholesterol: 15 mg
