
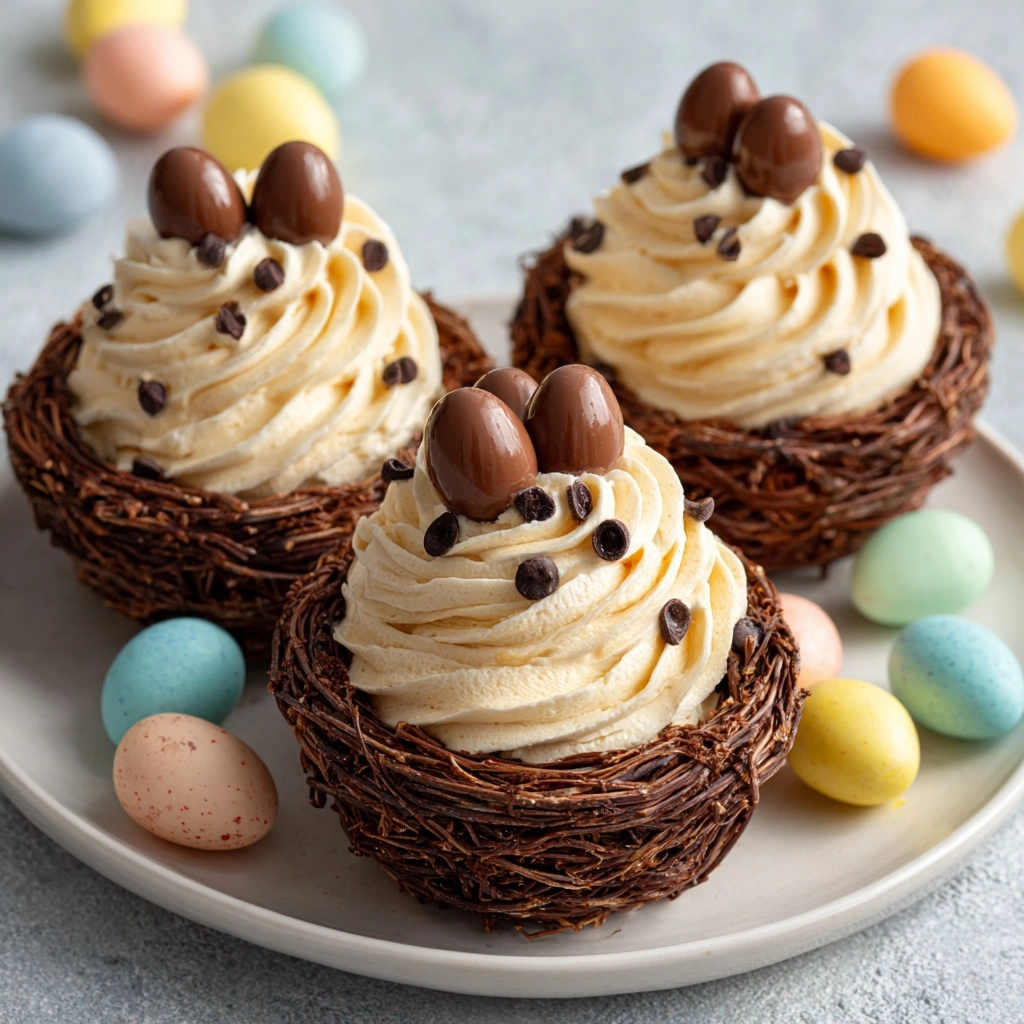
If you’re hunting for a playful, show-stopping treat to brighten your holiday table, Chocolate Meringue Easter Nests are guaranteed to steal the spotlight! Crisp on the outside with a dreamy, melt-in-your-mouth center, these whimsical nests are crowned with swirls of whipped cream or ganache and colorful candy eggs. They not only look stunning but also have that perfect pairing of chocolate and meringue—sweet, cloud-like bites with just enough chocolate indulgence. Whether you’re serving kids, chocolate lovers, or anyone who appreciates a homemade dessert, Chocolate Meringue Easter Nests bring joy and a burst of springtime magic to every gathering.
Ingredients You’ll Need
For these Chocolate Meringue Easter Nests, you only need a handful of pantry staples and a touch of chocolatey flair. Each ingredient brings something special—whether it’s stability, flavor, or a pop of color, nothing here is just for show!
- 4 large egg whites: Start with room temperature egg whites for the fluffiest, most stable meringue possible.
- 1 cup granulated sugar: Slowly adding the sugar helps dissolve it fully and gives that beautiful glossy shine.
- 1/4 teaspoon cream of tartar: A dash of this is the secret to strong, tall meringues that won’t collapse.
- 1/4 teaspoon salt: Just a pinch to balance the sweetness and sharpen all the chocolate flavor notes.
- 1/2 teaspoon vanilla extract: A splash rounds things out with cozy, fragrant depth.
- 2 tablespoons unsweetened cocoa powder (sifted): Cocoa is the soul of these nests, lending rich color and genuine chocolate flavor.
- 1/2 cup semi-sweet chocolate chips (melted): For that showy drizzle and extra layer of luscious chocolate at the bottom of each nest.
- 1 cup whipped cream or chocolate ganache (for filling): The creamy filling adds contrast and makes these nests a true dessert experience.
- 1/2 cup mini chocolate eggs or candy-coated eggs (for topping): These little candies are the cherry on top, making each nest as adorable as it is delicious.
How to Make Chocolate Meringue Easter Nests
Step 1: Prepare Your Workspace
First, preheat your oven to 225°F (110°C) and line a baking sheet with parchment paper. This step ensures your nests won’t stick and will lift off easily without any stress. Having everything ready before you start whipping the egg whites keeps the process smooth and stress-free.
Step 2: Whip the Egg Whites
In a meticulously clean, dry mixing bowl, beat the egg whites on medium speed until they’re foamy and airy. This sets the stage for a lofty meringue. Add cream of tartar and salt, and continue beating until the peaks are just starting to hold—soft but not droopy.
Step 3: Add the Sugar Gradually
Now, with the mixer on high, add the granulated sugar one tablespoon at a time—taking it slow is key! Keep beating until the mixture becomes thick, glossy, and forms stiff peaks. Rubbing a bit between your fingers, the mixture should feel smooth with no sugar grit left behind.
Step 4: Flavor and Color
Gently fold in the vanilla extract and sifted cocoa powder. Don’t overmix—just enough for the cocoa to swirl through and give your Chocolate Meringue Easter Nests their signature color and decadent flavor.
Step 5: Pipe and Shape the Nests
Spoon the mixture into a piping bag fitted with a large star tip. Pipe 3-inch circles onto your prepared baking sheet, then go around the edge again to build up a lovely little “nest” wall. If you don’t have a piping bag, a spoon works in a pinch—just shape the nests with the back of the spoon.
Step 6: Bake and Cool
Slide the nests into the oven and bake for 1 hour. When the timer dings, turn off the oven but let the meringues cool inside for another hour. This gentle cool-down keeps them crisp and prevents cracks—patience pays off here!
Step 7: Chocolate Drizzle and Assembly
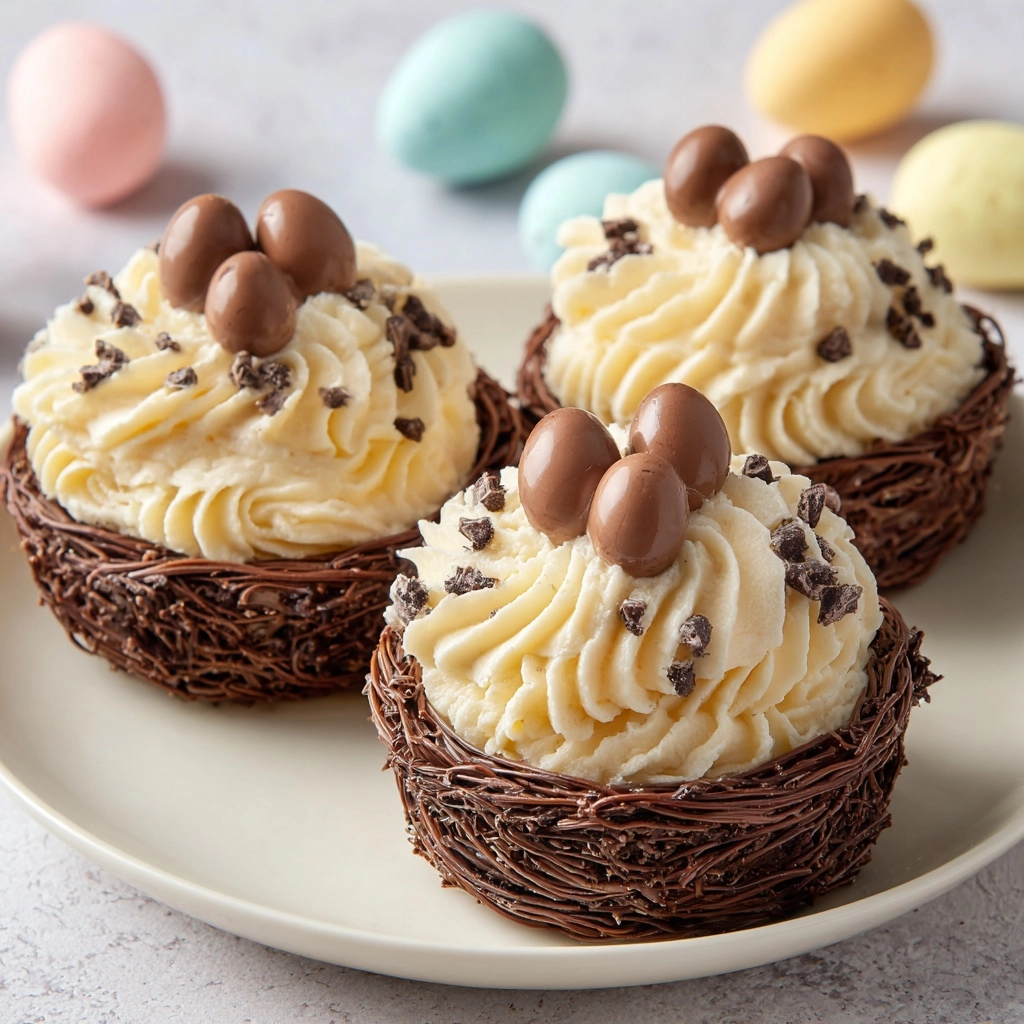
Once cooled, drizzle melted semi-sweet chocolate into the center of each nest and let it set. Then fill each nest with whipped cream or chocolate ganache and crown with mini chocolate eggs. That’s when the real magic happens and your Chocolate Meringue Easter Nests come to life!
How to Serve Chocolate Meringue Easter Nests
Garnishes
Garnishing Chocolate Meringue Easter Nests is pure fun. Alongside the candy eggs, you can add a dusting of cocoa powder, a drizzle of extra melted chocolate, or even a bit of edible gold leaf for a touch of glamour. Let your creative side shine for the prettiest finish!
Side Dishes
These nests are lovely on their own, but if you want to build a springtime dessert platter, add fresh berries, a bowl of lemon curd, or mini macarons. A scoop of raspberry sorbet or a mug of creamy hot chocolate is also a dreamy companion to these delicate treats.
Creative Ways to Present
Arrange Chocolate Meringue Easter Nests on a tiered cake stand for a striking centerpiece, or nestle each one in a colorful cupcake liner for easy, hands-on sharing. For a playful twist, add edible grass or shredded coconut dyed green—an instant “nest” effect!
Make Ahead and Storage
Storing Leftovers
Unfilled Chocolate Meringue Easter Nests will stay fresh and crisp for up to 3 days in an airtight container at room temperature—just make sure they’re away from any humidity. Once filled, enjoy them that day since the cream or ganache starts to soften the meringue after a few hours.
Freezing
If you’d like to make these ahead, you can freeze the plain meringue nests (unfilled and undrizzled) in a tightly sealed container for up to a month. Just let them thaw (still wrapped) at room temperature before assembling. Freezing is not recommended for the filled nests, as the cream or ganache can separate.
Reheating
Chocolate Meringue Easter Nests don’t need reheating—just fill and serve at room temperature. If the meringue loses its crispness, a quick pop in a low oven (around 200°F) for 10-15 minutes can help restore some of the crunch. Always cool completely before adding any toppings.
FAQs
Can I use a different kind of chocolate?
Definitely! Semi-sweet is classic, but dark chocolate or even white chocolate both pair beautifully with meringue. For extra richness, try a flavored ganache or an infusion of espresso powder for mocha-lovers.
Why did my meringue nests crack?
Cracks can happen if the meringues cool too quickly or the oven is too hot. Always cool them in the oven with the door slightly ajar after baking. A crack or two won’t affect the flavor—they’ll still be delicious!
How do I know when the meringues are baked enough?
The meringue should feel dry to the touch and lift easily off the parchment. If they still feel sticky after cooling, pop them back in the oven for another 15-20 minutes.
Can I make Chocolate Meringue Easter Nests without a piping bag?
Absolutely! Just spoon the meringue into mounds and use the back of a spoon to make an indentation in the center, creating a rustic nest shape. They’ll look charmingly homemade and taste just as heavenly.
What’s the best way to transport these nests?
For safest results, carry the meringue nests and fillings separately, then fill and garnish them upon arrival. If you must assemble ahead, snugly pack them in a container lined with parchment, keeping the box level and cushioned for the ride.
Final Thoughts
There’s just something irresistibly joyful about making and sharing Chocolate Meringue Easter Nests—they’re as delightful to create as they are to eat. Whether you’re crafting them for a holiday gathering or as a sweet surprise, don’t miss the chance to let your personality shine with decorations and fillings. I hope you’ll dive in, get creative, and enjoy every chocolatey, crunchy bite!
Print
Chocolate Meringue Easter Nests Recipe
- Prep Time: 25 minutes
- Cook Time: 1 hour
- Total Time: 1 hour 25 minutes
- Yield: 8 nests
- Category: Dessert
- Method: Baking
- Cuisine: American
- Diet: Vegetarian
Description
These Chocolate Meringue Easter Nests are a delightful treat perfect for Easter or spring gatherings. Crispy meringue nests filled with creamy whipped cream or chocolate ganache and topped with mini chocolate eggs – a festive and delicious dessert!
Ingredients
Meringue Nests:
- 4 large egg whites
- 1 cup granulated sugar
- 1/4 teaspoon cream of tartar
- 1/4 teaspoon salt
- 1/2 teaspoon vanilla extract
- 2 tablespoons unsweetened cocoa powder (sifted)
Additional:
- 1/2 cup semi-sweet chocolate chips (melted)
- 1 cup whipped cream or chocolate ganache (for filling)
- 1/2 cup mini chocolate eggs or candy-coated eggs (for topping)
Instructions
- Preheat the oven: Preheat the oven to 225°F (110°C) and line a baking sheet with parchment paper.
- Prepare meringue: Beat egg whites until foamy, then add cream of tartar, salt, and sugar gradually until stiff peaks form. Fold in vanilla extract and cocoa powder.
- Pipe the nests: Transfer meringue to a piping bag fitted with a star tip. Pipe circles onto the baking sheet and build up edges to form nests.
- Bake: Bake for 1 hour, then cool in the oven.
- Fill and decorate: Drizzle melted chocolate into nests, let set, fill with whipped cream or ganache, and top with mini chocolate eggs.
Notes
- Store unfilled meringue nests in an airtight container for up to 3 days.
- Variation: Use flavored ganache or lemon curd for filling.
- For crispier nests, let meringues dry overnight in the oven.
Nutrition
- Serving Size: 1 nest
- Calories: 160
- Sugar: 21 g
- Sodium: 65 mg
- Fat: 6 g
- Saturated Fat: 3.5 g
- Unsaturated Fat: 2 g
- Trans Fat: 0 g
- Carbohydrates: 25 g
- Fiber: 1 g
- Protein: 2 g
- Cholesterol: 15 mg


