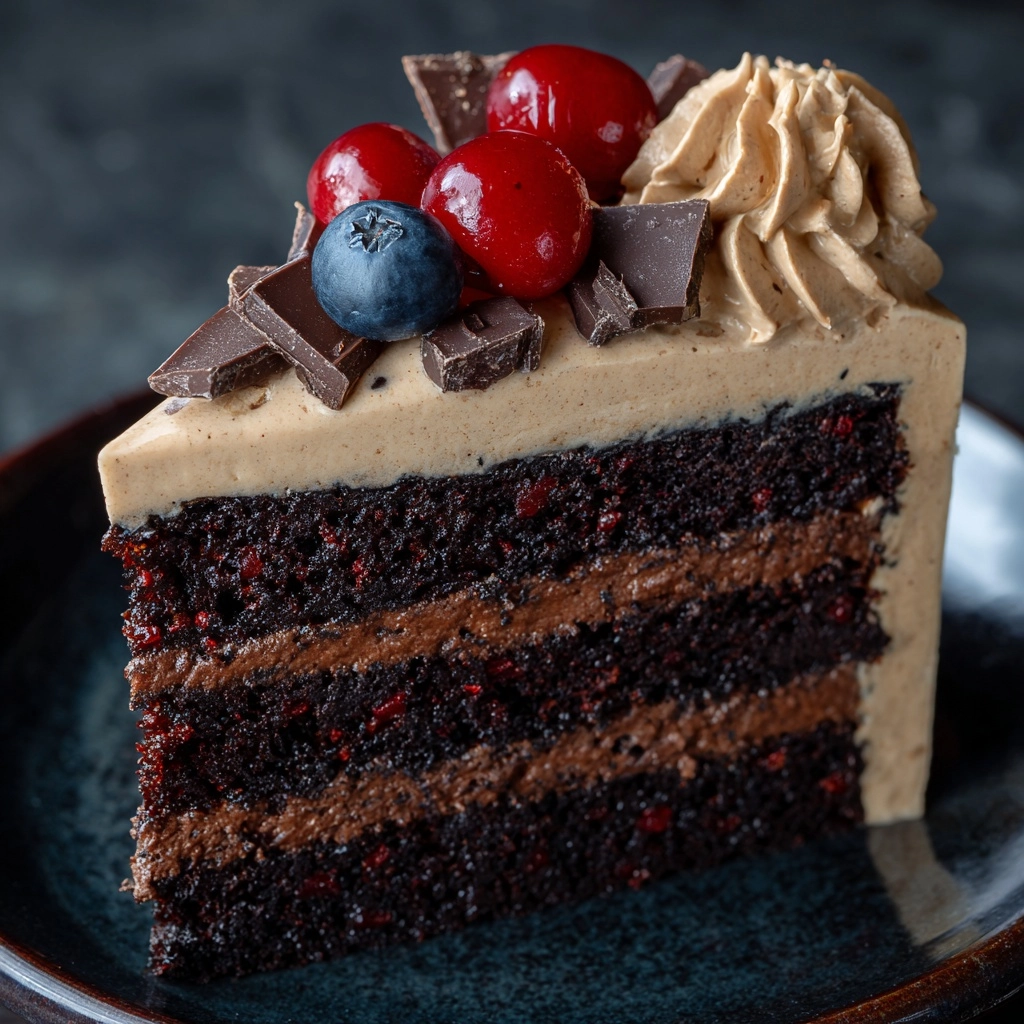
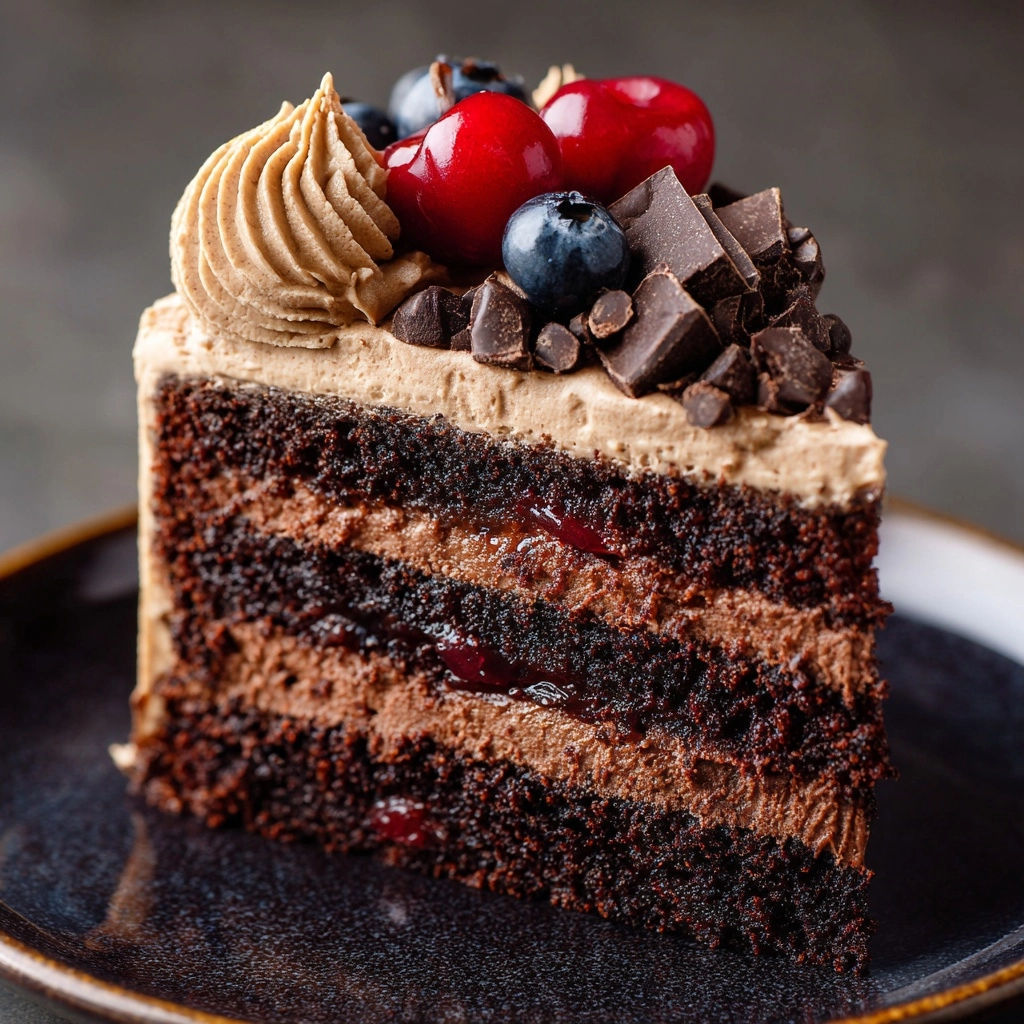
If you’re in the mood for something truly spectacular, the Chocolate Forest Cake is an absolute showstopper that delivers rich chocolate layers, luscious whipped cream, and bursts of juicy cherries in every bite. This classic European-inspired dessert is a celebration cake through and through, perfect for birthdays, holidays, or whenever you want to turn an ordinary day into something unforgettable. The combination of moist chocolate sponge, creamy filling, and the deep cherry flavor makes this cake irresistible to chocolate lovers and fruit fans alike.
Ingredients You’ll Need
The magic of Chocolate Forest Cake comes from a handful of thoughtfully chosen ingredients that each play a vital role. From rich cocoa to tart cherries and pillowy whipped cream, every element works together to create a harmonious, decadent dessert.
- All-Purpose Flour: Provides the structure for the cake, ensuring each slice is tender yet sturdy enough for those luscious layers.
- Granulated Sugar: Sweetens the cake and helps keep it moist; don’t skimp for best results!
- Unsweetened Cocoa Powder: Gives the cake its deep, chocolatey flavor—use a good quality brand for the ultimate taste.
- Baking Powder and Baking Soda: The dynamic duo that helps your cake rise beautifully and stay fluffy.
- Salt: Just a touch to balance all the sweetness and intensify the chocolate flavor.
- Whole Milk: Adds richness and moisture, making each bite melt-in-your-mouth soft.
- Vegetable Oil: Keeps the cake extra tender and moist, even after chilling.
- Large Eggs: Bind the ingredients together and add a subtle richness.
- Vanilla Extract: Enhances all the flavors and brings a lovely warmth to the cake.
- Boiling Water: Thins the batter for a lighter texture and intensifies the cocoa’s flavor.
- Heavy Whipping Cream: Whipped to soft peaks, it becomes the dreamy filling and frosting for this cake.
- Powdered Sugar: Sweetens the whipped cream without making it grainy.
- Kirsch or Cherry Liqueur: Adds a signature cherry kick—swap for cherry juice for an alcohol-free version.
- Pitted Cherries: The star fruit! Use fresh when in season or high-quality canned cherries for convenience.
- Cherry Preserves: Spreads easily between layers, amping up the cherry flavor in every forkful.
- Semisweet Chocolate (shaved or grated): The finishing touch, adding a gorgeous look and extra chocolate punch.
How to Make Chocolate Forest Cake
Step 1: Prepare the Cake Pans and Oven
Begin by preheating your oven to 350°F (175°C). Grease and flour two 9-inch round cake pans—this little bit of prep ensures your cake layers pop out perfectly every time. Nothing’s sadder than a beautiful cake stuck in its pan!
Step 2: Mix the Dry Ingredients
In a large mixing bowl, whisk together the flour, granulated sugar, cocoa powder, baking powder, baking soda, and salt. This step guarantees an even distribution of all the essentials, so every bite of your Chocolate Forest Cake is balanced in flavor and texture.
Step 3: Add the Wet Ingredients
Add the whole milk, vegetable oil, eggs, and vanilla extract directly to your dry mixture. Beat everything on medium speed until you have a smooth, luscious batter. This is where the magic really starts to happen—the aroma alone is incredible!
Step 4: Stir in Boiling Water
Carefully stir in the boiling water. Don’t worry if the batter seems thin; this is exactly what you want for a moist, light crumb. This trick is a game changer for chocolate cakes!
Step 5: Bake the Cake Layers
Divide the batter evenly between your prepared pans and slide them into the oven. Bake for 30–35 minutes, or until a toothpick inserted in the center comes out clean. The anticipation is real, but soon your kitchen will be filled with the most heavenly chocolate aroma.
Step 6: Cool the Cakes
Let the cakes cool in their pans for about 10 minutes, then gently turn them out onto wire racks. Allow them to cool completely—patience pays off here, as warm cakes and whipped cream are not friends!
Step 7: Whip the Cream
In a chilled bowl, whip the heavy cream with powdered sugar until stiff peaks form. This is your cloud-like filling and frosting, so don’t rush it. The colder the bowl and cream, the fluffier the result.
Step 8: Slice and Soak the Cake Layers
With a serrated knife, carefully slice each cake horizontally to create four thin layers. Brush each layer lightly with kirsch or cherry juice, infusing them with that signature fruity flavor. This step ensures every bite of your Chocolate Forest Cake is moist and flavorful.
Step 9: Assemble the Cake
Place one cake layer on a serving plate, spread with a generous layer of whipped cream, then scatter over some pitted cherries and a thin layer of cherry preserves. Repeat with the remaining layers, finishing with a thick, dreamy blanket of whipped cream on top and around the sides.
Step 10: Decorate and Chill
Shower the top and sides with chocolate shavings and a few extra cherries for an irresistible, bakery-worthy finish. Chill the assembled cake for at least 1 hour to set the flavors and make slicing a breeze.
How to Serve Chocolate Forest Cake

Garnishes
For the most striking presentation, top your Chocolate Forest Cake with extra whipped cream, a generous heap of chocolate shavings, and plenty of plump cherries. A few mint leaves add a pop of color if you’re feeling fancy. Don’t forget a dusting of powdered sugar for that snowy, woodland touch!
Side Dishes
This cake is a star on its own, but a scoop of vanilla bean ice cream or a dollop of crème fraîche alongside each slice creates a dreamy pairing. For something lighter, serve with a bowl of fresh berries or a simple cherry compote to echo the flavors in the cake.
Creative Ways to Present
Try assembling mini Chocolate Forest Cakes in glass jars for a fun, portable dessert. Or, cut the cake into cubes and layer with cream and cherries in a trifle dish for a stunning centerpiece. Individual slices can be plated with a drizzle of cherry syrup for that extra wow factor.
Make Ahead and Storage
Storing Leftovers
Chocolate Forest Cake keeps beautifully in the fridge. Simply cover leftover slices or the whole cake with plastic wrap or place in an airtight container. It will stay moist and delicious for up to 3 days, making it perfect for enjoying a little treat all week long.
Freezing
If you want to get ahead, you can freeze the plain chocolate cake layers (before filling) for up to 2 months. Wrap them tightly in plastic wrap and foil. Thaw overnight in the fridge before assembling your Chocolate Forest Cake fresh with cream and cherries.
Reheating
This is one cake that’s best served chilled, so no need to reheat! If you prefer a slightly softer texture, simply let your slice sit at room temperature for about 15 minutes before serving.
FAQs
Can I make Chocolate Forest Cake without alcohol?
Absolutely! Simply swap the kirsch or cherry liqueur for cherry juice. You’ll still get that wonderful fruity flavor without any alcohol.
What type Dessert
Fresh, pitted cherries are ideal when in season, but canned sour cherries (drained) work beautifully too. Just be sure to avoid overly sweet pie filling for the most balanced taste.
Can I use store-bought whipped cream?
For the best texture and flavor, homemade whipped cream is highly recommended. Store-bought versions can deflate or be too sweet, which may overpower the delicate balance of Chocolate Forest Cake.
How do I get clean, even layers?
Use a long, serrated knife and take your time slicing each cake layer. Rotating the cake as you go helps keep the layers even. Chilling the cakes briefly before slicing can also make the process easier.
Can Chocolate Forest Cake be made gluten-free?
Yes, you can substitute your favorite 1:1 gluten-free flour blend for the all-purpose flour. Just check that your other ingredients are gluten-free, and enjoy!
Final Thoughts
If you’re looking for a dessert that’s as impressive as it is delicious, Chocolate Forest Cake is the answer. Once you’ve tasted those chocolatey layers, sweet cream, and juicy cherries, you’ll want to make this recipe a regular part of your celebrations. Gather your ingredients and treat yourself—you deserve every decadent bite!
Print
Chocolate Forest Cake Recipe
- Prep Time: 30 minutes
- Cook Time: 35 minutes
- Total Time: 1 hour 5 minutes
- Yield: 12 servings
- Category: Dessert
- Method: Baking
- Cuisine: European
- Diet: Vegetarian
Description
This classic Chocolate Forest Cake, inspired by the traditional Black Forest gateau, combines rich chocolate layers with whipped cream and juicy cherries for an irresistible European dessert. Perfectly moist cake layers soaked with kirsch and layered with luscious cherries and whipped cream make this an elegant and delightful treat for any occasion.
Ingredients
Dry Ingredients
- 2 cups all-purpose flour
- 2 cups granulated sugar
- 3/4 cup unsweetened cocoa powder
- 2 teaspoons baking powder
- 1 1/2 teaspoons baking soda
- 1 teaspoon salt
Wet Ingredients
- 1 cup whole milk
- 1/2 cup vegetable oil
- 2 large eggs
- 2 teaspoons vanilla extract
- 1 cup boiling water
Filling and Topping
- 2 cups heavy whipping cream
- 1/4 cup powdered sugar
- 2 tablespoons kirsch or cherry liqueur
- 2 cups pitted cherries (fresh or canned, drained)
- 1/2 cup cherry preserves
- 4 ounces semisweet chocolate (shaved or grated for garnish)
Instructions
- Preheat and Prepare Pans: Preheat the oven to 350°F (175°C). Grease and flour two 9-inch round cake pans to prevent sticking.
- Mix Dry Ingredients: In a large bowl, whisk together the flour, sugar, cocoa powder, baking powder, baking soda, and salt to ensure even distribution of leavening agents and flavor.
- Add Wet Ingredients: Add milk, vegetable oil, eggs, and vanilla extract to the dry mixture. Beat on medium speed until the batter is smooth and well combined.
- Incorporate Boiling Water: Stir in the boiling water carefully until the batter is thin and smooth, which helps create a moist cake texture.
- Bake the Cakes: Divide the batter evenly between the prepared pans. Bake for 30 to 35 minutes, or until a toothpick inserted in the center comes out clean. Remove from oven and let cakes cool in pans for 10 minutes.
- Cool Cakes Completely: Transfer cakes to wire racks and allow to cool completely to room temperature before assembling.
- Whip the Cream: In a chilled bowl, whip the heavy cream with powdered sugar until stiff peaks form, ensuring a stable frosting for layering.
- Slice Cake Layers: Carefully slice each cake layer horizontally in half to create four thin, even layers for layering.
- Brush with Kirsch: Lightly brush each layer with kirsch or cherry liqueur to infuse flavor and moisture.
- Assemble the Cake: Place one cake layer on a serving plate. Spread a layer of whipped cream on top, followed by a layer of pitted cherries. Repeat this process with remaining layers, finishing with whipped cream on top and spreading whipped cream on the sides.
- Decorate: Garnish the top and sides with grated or shaved semisweet chocolate and extra cherries for an elegant finish.
- Chill: Refrigerate the assembled cake for at least 1 hour before serving to allow flavors to meld and the frosting to set.
Notes
- For a non-alcoholic version, substitute cherry juice for kirsch to maintain moisture without alcohol.
- Canned sour cherries are a great alternative if fresh cherries are not available or out of season.
- Keep the cake refrigerated until ready to serve to preserve freshness and cream texture.
- Use room temperature eggs and milk to ensure batter blends smoothly.
- Whip cream in a chilled bowl to achieve quicker and stiffer peaks.
Nutrition
- Serving Size: 1 slice
- Calories: 410
- Sugar: 34 g
- Sodium: 220 mg
- Fat: 22 g
- Saturated Fat: 12 g
- Unsaturated Fat: 8 g
- Trans Fat: 0 g
- Carbohydrates: 49 g
- Fiber: 3 g
- Protein: 5 g
- Cholesterol: 65 mg
