
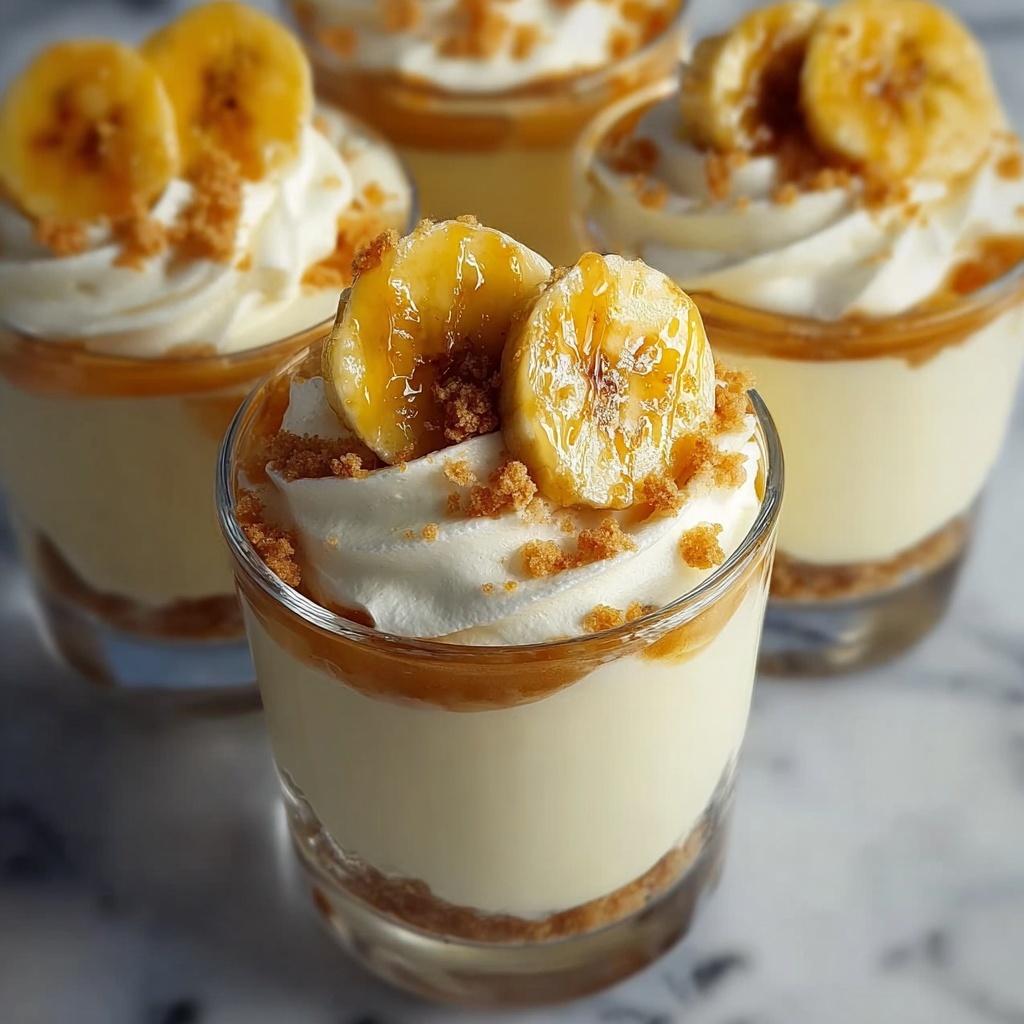
If you’ve ever dreamed of a classic Southern dessert that’s cool, creamy, and bursting with layers of flavor, this Banana Pudding Cups Recipe is your new best friend. Perfectly simple yet irresistibly luscious, these cups bring together soft vanilla wafers, fresh bananas, and a dreamy pudding whipped to silken perfection. Each bite is a nostalgic celebration of textures and tastes, making this recipe an absolute must-try whether you’re whipping up a casual weeknight treat or impressing guests at your next gathering.

Ingredients You’ll Need
Every ingredient in this Banana Pudding Cups Recipe plays a starring role, working together to create the perfect balance of creamy, crunchy, and fruity goodness. From the rich instant vanilla pudding to the fresh bananas and fluffy whipped cream, these essentials transform a few pantry staples into a delightful dessert.
- Instant vanilla pudding mix: The creamy base that sets quickly and provides rich flavor without fuss.
- Cold whole milk: Adds a smooth, velvety texture when combined with the pudding mix.
- Heavy whipping cream, cold: Whipped to fluffy peaks, it lightens the pudding and adds luxurious creaminess.
- Powdered sugar: Sweetens the whipped cream just enough to bring balance without overpowering.
- Vanilla extract: Enhances the dessert with warm, comforting vanilla notes.
- Ripe bananas, sliced: Fresh and flavorful, they add natural sweetness and soft texture.
- Vanilla wafer cookies: Provide a nostalgic crunch and help soak up pudding for perfect layers.
How to Make Banana Pudding Cups Recipe
Step 1: Prepare the Pudding
Start by whisking the instant vanilla pudding mix with cold whole milk for about two minutes until the mixture thickens nicely. Then, pop it into the refrigerator for five minutes to let it set just enough. This simple start is key to getting that dreamy, luscious pudding texture without any stove time.
Step 2: Whip the Cream
While the pudding chills, grab your heavy whipping cream, the powdered sugar, and vanilla extract. Whip them together until stiff peaks form—this means the cream holds its shape when you lift the whisk. The whipped cream will add cloud-like lightness to the pudding mixture.
Step 3: Fold and Lighten
Gently fold half of the whipped cream into your chilled pudding. This step is crucial to keep the mixture airy and creamy instead of dense. Folding carefully ensures that your Banana Pudding Cups Recipe has that melt-in-your-mouth softness that everyone adores.
Step 4: Layer the Cups
Take small cups or jars and start layering with crushed or whole vanilla wafer cookies, then add a layer of banana slices. Spoon a layer of the pudding mixture over the bananas. Repeat these layers until the cups are almost full, making sure to finish with a final pudding layer for a smooth top.
Step 5: Top and Chill
Top each cup with a generous dollop of the remaining whipped cream, adding a beautiful final touch and extra creaminess. Chill the assembled Banana Pudding Cups for at least one hour to let the flavors meld and the textures marry perfectly before serving.
How to Serve Banana Pudding Cups Recipe
Garnishes
To elevate your Banana Pudding Cups Recipe, consider adding a sprinkle of crushed vanilla wafers or a few chocolate shavings on top. A single banana slice or a mint leaf can give a fresh pop of color and contrast, making your dessert as pretty as it is tasty.
Side Dishes
This dessert pairs wonderfully with light accompaniments such as fresh berries or a simple mixed green salad with a tangy vinaigrette. The fresh, tart notes help balance the sweet richness of the pudding cups, creating a harmonious meal when served together.
Creative Ways to Present
For a fun twist, serve your Banana Pudding Cups Recipe in mini mason jars, parfait glasses, or even edible cookie cups. Layering in transparent containers lets the beautiful stripes of cookies, bananas, and pudding shine through, enticing every guest to dig in!
Make Ahead and Storage
Storing Leftovers
Banana Pudding Cups store beautifully in the refrigerator for up to two days. Keep them covered tightly with plastic wrap or lids to prevent the bananas from browning and to maintain the pudding’s smooth texture.
Freezing
Freezing is not recommended for this Banana Pudding Cups Recipe, as the texture of the bananas and pudding can become waterlogged and lose their delightful creaminess upon thawing.
Reheating
This dessert is best enjoyed chilled and does not require reheating. Simply serve straight from the fridge to preserve that cool, refreshing taste and silky texture that makes banana pudding so special.
FAQs
Can I use homemade pudding instead of instant?
Absolutely! Homemade vanilla pudding works wonderfully and adds a fresh-from-scratch flair, although the instant mix saves time and effort.
How do I keep the bananas from browning?
Slice the bananas just before assembling your dessert to minimize browning, which keeps the cups looking fresh and appetizing.
Can I make this dessert vegan?
To make a vegan version, substitute the milk and cream with plant-based alternatives and look for dairy-free vanilla pudding mixes and vegan cookies.
What’s the best way to crush the vanilla wafers?
Place the wafers in a sealed plastic bag and gently crush them with a rolling pin for evenly sized crumbs that layer beautifully in the pudding cups.
Can I prepare Banana Pudding Cups Recipe in larger containers?
Definitely! You can layer this dessert in a trifle bowl or a large dish, but individual cups make for charming presentation and portion control.
Final Thoughts
This Banana Pudding Cups Recipe is one of those timeless desserts that feels like a warm hug in every bite. Easy to make, stunning to serve, and utterly delicious, it’s perfect for both everyday treats and special occasions. I can’t wait for you to try it and share it with those you love—get ready for some serious dessert happiness.
Print
Banana Pudding Cups Recipe
- Prep Time: 15 minutes
- Cook Time: 0 minutes
- Total Time: 1 hour 15 minutes
- Yield: 6 cups
- Category: Dessert
- Method: No-Cook
- Cuisine: American
- Diet: Vegetarian
Description
Delightful Banana Pudding Cups featuring layers of creamy vanilla pudding, fresh ripe bananas, and crunchy vanilla wafer cookies. This no-bake, easy-to-make dessert is perfect for individual servings and comes together quickly with instant pudding mix and homemade whipped cream, making it a crowd-pleaser for any occasion.
Ingredients
Pudding Mixture
- 1 box instant vanilla pudding mix (3.4 ounces)
- 2 cups cold whole milk
Whipped Cream
- 1 cup cold heavy whipping cream
- 2 tablespoons powdered sugar
- 1 teaspoon vanilla extract
Other
- 3 ripe bananas, sliced
- 1 1/2 cups vanilla wafer cookies, crushed or whole
Instructions
- Prepare the pudding: In a mixing bowl, whisk together the instant vanilla pudding mix and cold whole milk for about 2 minutes until thickened. Refrigerate the mixture for 5 minutes to allow it to fully set.
- Make the whipped cream: In a separate chilled bowl, whip the cold heavy cream with powdered sugar and vanilla extract until stiff peaks form, indicating that the cream is stable and fluffy.
- Lighten the pudding: Gently fold half of the whipped cream into the chilled pudding mixture. This step lightens the texture, making the pudding creamier and more airy.
- Assemble the cups: Start by layering vanilla wafers at the bottom of small cups or jars. Add a layer of banana slices on top of the wafers, followed by a layer of the pudding mixture. Repeat these layers—wafers, bananas, pudding—until the cups are filled, finishing with a final layer of pudding.
- Top with whipped cream: Spoon the remaining whipped cream over the top of each cup to create a creamy finishing touch.
- Chill before serving: Refrigerate the assembled pudding cups for at least 1 hour. Chilling enhances the flavors and allows the pudding to set perfectly for ideal texture.
Notes
- Slice bananas just before assembling to prevent them from browning and maintain a fresh appearance.
- For a homemade version, you can substitute instant pudding with cooked vanilla pudding if desired.
- Use cold ingredients (milk and cream) to ensure the pudding and whipped cream set properly and achieve the best texture.

