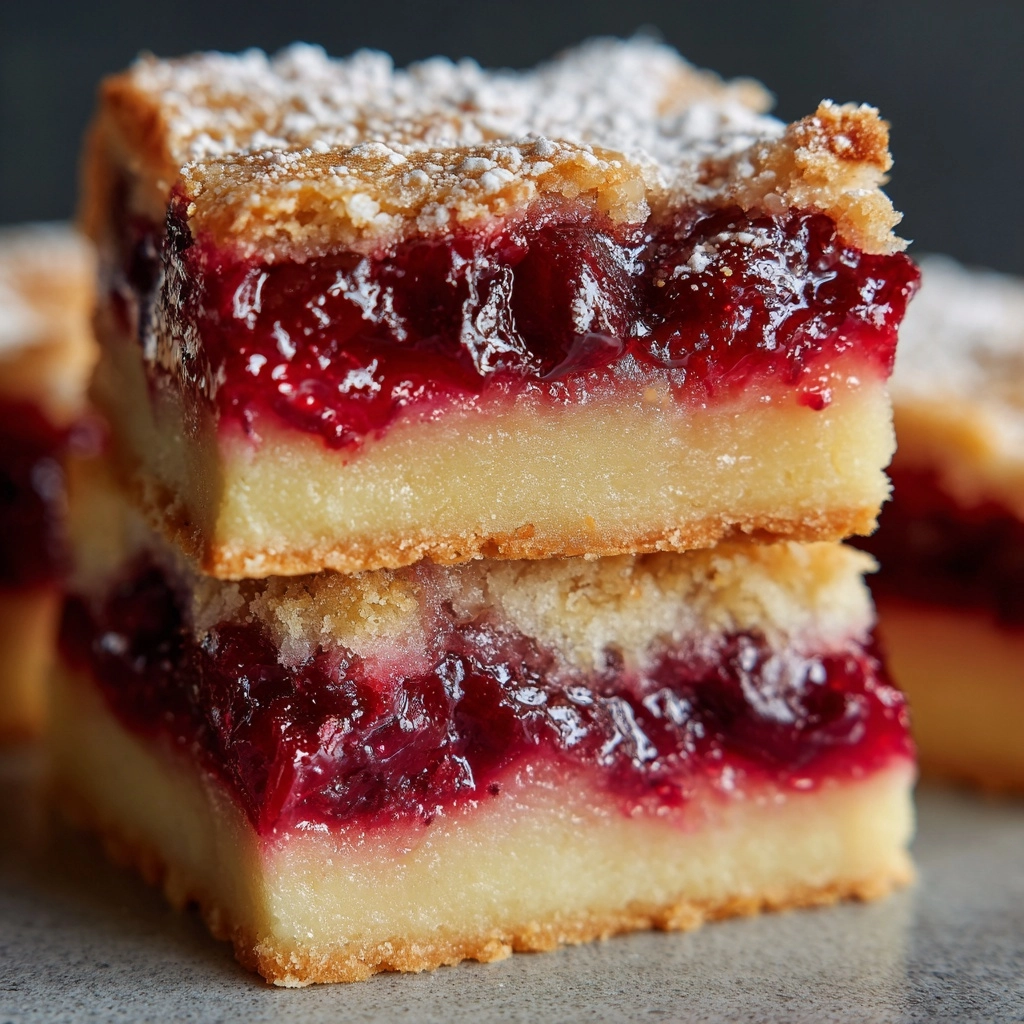
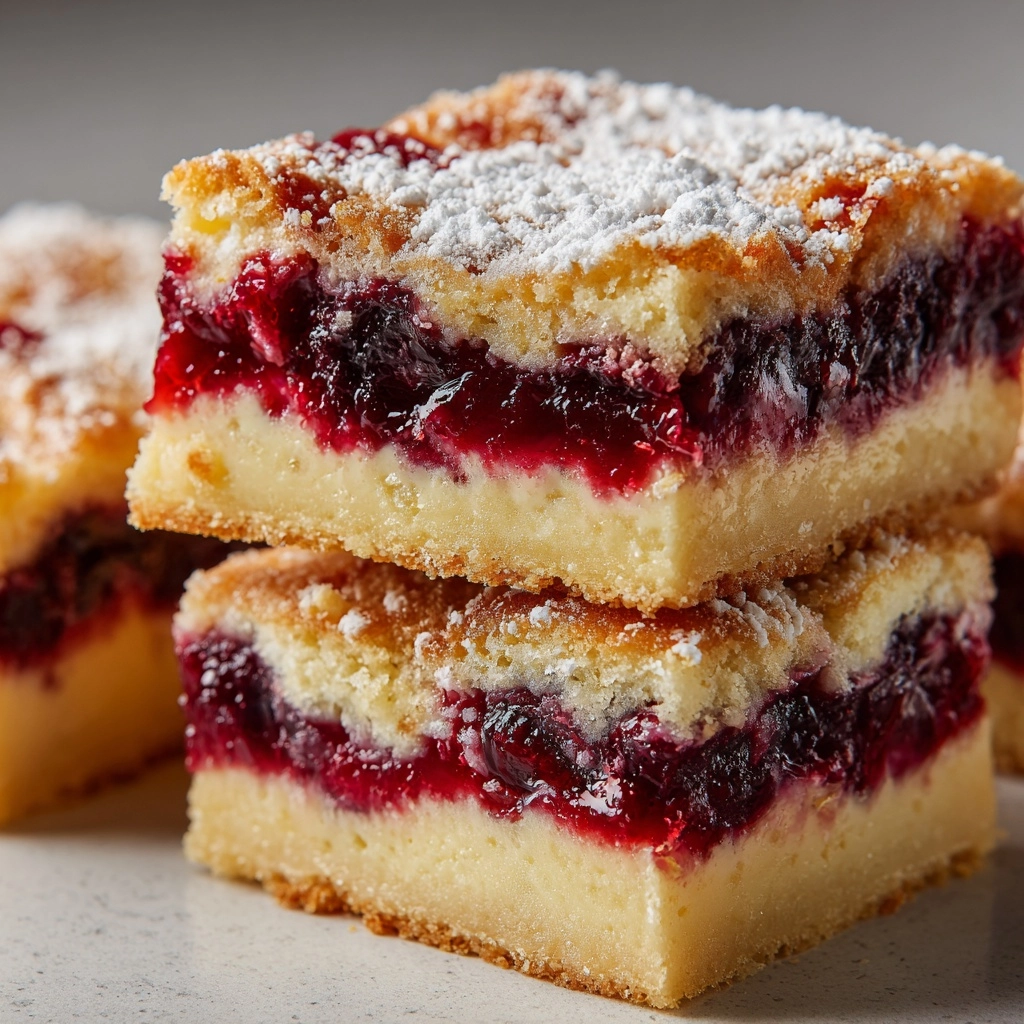
If you’re looking to impress friends and family with a treat that feels like a celebration in every bite, Cherry Pie Bars are your ticket to a crowd-pleasing dessert. Imagine everything you love about classic cherry pie—the buttery crust, the sweet-tart filling, and that irresistible hint of almond—all transformed into easy-to-share squares. Cherry Pie Bars come together quickly, look stunning on any dessert tray, and pair soft, golden layers with a sunburst of vibrant cherry. They’re the kind of dessert you’ll want to make (and eat!) again and again, especially when you need something both nostalgic and effortless.
Ingredients You’ll Need
Cherry Pie Bars are delightfully simple, relying on pantry staples and a few flavor-boosting mix-ins. Each ingredient plays a role in making these bars the perfect combination of buttery base, luscious cherry, and dreamy glaze.
- Butter: Use unsalted for rich flavor and control over the saltiness of your bars.
- Granulated Sugar: Adds just the right amount of sweetness to balance the tang of cherries.
- Eggs: These bind everything together, ensuring the bars are tender but hold their shape.
- Vanilla Extract: For that classic warm and cozy aroma in both batter and glaze.
- Almond Extract: Don’t skip this—it gives the bars a lovely bakery-style finish!
- All-Purpose Flour: Provides structure and chew so the bars slice perfectly.
- Baking Powder: Lifts the batter to just the right soft, cake-like texture.
- Salt: Enhances all the flavors and keeps the sweetness in check.
- Cherry Pie Filling: The star of the show! Go for a quality can and spread the love evenly.
- Powdered Sugar: Essential for a smooth, drizzle-worthy glaze.
- Milk: Helps the glaze reach that dreamy, pourable consistency.
How to Make Cherry Pie Bars
Step 1: Prep Your Pan and Oven
Start by getting your oven nice and hot at 350°F (175°C). Prep a 9×13-inch baking pan—either grease it generously or, if you want zero sticking and easy cleanup, line it with parchment paper. This way, your Cherry Pie Bars will lift right out once baked.
Step 2: Cream Butter and Sugar
In a large mixing bowl, beat the softened butter and granulated sugar until the blend turns pale and delightfully fluffy. This step adds air, making the base lighter and giving that melt-in-your-mouth texture Cherry Pie Bars are known for.
Step 3: Add Eggs and Extracts
One at a time, add the eggs, mixing well after each addition to keep the batter smooth and cohesive. Next, pour in the vanilla and almond extracts, stirring until combined. The almond especially will make your kitchen smell heavenly!
Step 4: Combine Dry Ingredients
In a separate bowl, whisk together flour, baking powder, and salt. Gradually add the dry mixture to the wet ingredients, blending just until you don’t see streaks of flour. Overmixing can lead to tough bars, so keep it gentle!
Step 5: Assemble the Bars
Spread about two-thirds of your batter into that prepared pan—an offset spatula helps to get an even layer. Spoon the cherry pie filling evenly over the top, spreading carefully all the way to the edges so every bite is jam-packed with fruit. Drop the remaining batter in rustic spoonfuls across the cherries; it doesn’t need to cover the entire surface, those pops of red make for a charming, rustic finish.
Step 6: Bake
Bake for 35–40 minutes, or until the top is golden and a toothpick poked into the center (through both batter and filling) comes out clean. The aroma as they bake is pure magic! Let the bars cool completely in the pan, so they set up nicely for slicing.
Step 7: Glaze and Finish
Whisk together the powdered sugar, milk, and vanilla extract until you have a smooth, pourable glaze. Drizzle it all over the cooled bars, letting it pool and set. Once the glaze firms up, slice your Cherry Pie Bars into squares and get ready to serve.
How to Serve Cherry Pie Bars
Garnishes
A sprinkle of sliced almonds or a dusting of extra powdered sugar gives your Cherry Pie Bars that little something extra. For special occasions, a few fresh cherries or even some grated dark chocolate can make the bars look and taste even more indulgent.
Side Dishes
Pair Cherry Pie Bars with a scoop of vanilla ice cream or a dollop of whipped cream if you want to turn dessert into a truly decadent affair. For a coffee break or picnic, they’re perfect on their own alongside a piping hot mug of coffee or tea—the rich, fruity flavor is a natural complement to both.
Creative Ways to Present
Cut your Cherry Pie Bars into triangles or diamonds for a fun twist on the classic square. For parties, try skewering minis on sticks for cherry pie “bar pops.” Arrange on a platter with alternating layers of fresh cherries, or tuck them into pretty cupcake liners for a pop-out-of-the-box potluck treat.
Make Ahead and Storage
Storing Leftovers
If you somehow have any Cherry Pie Bars left over, simply store them in an airtight container at room temperature for 2–3 days. For extra longevity, you can pop them in the fridge where they’ll stay fresh for up to 5 days. The glaze keeps the bars moist and delicious.
Freezing
Cherry Pie Bars freeze beautifully! Once sliced and glazed, layer them between sheets of parchment paper in an airtight container or freezer bag. They’ll keep for up to 3 months—just thaw at room temperature or in the fridge overnight when you’re ready to enjoy.
Reheating
To gently refresh the bars, warm individual pieces in the microwave for about 10–15 seconds. If you prefer that just-baked texture, a few minutes in a low oven (300°F/150°C) works wonders. For best results, glaze after reheating if you’ve frozen the bars.
FAQs
Can I use homemade cherry pie filling instead of canned?
Absolutely! Homemade cherry pie filling will make these bars even more special. Just be sure it’s thick enough not to make the bars too soggy, and use about the same quantity as the recipe calls for.
Can I substitute other fruits for the cherry pie filling?
Definitely! Blueberry, apple, or even peach pie filling all work beautifully. Each one brings its own unique flavor to the Cherry Pie Bars, so feel free to mix it up based on the season or your own cravings.
How do I know when Cherry Pie Bars are done baking?
Look for a light golden top, and use the toothpick test: insert a toothpick in the center, and if it comes out mostly clean (a bit of cherry on it is fine), they’re ready to cool. Overbaking can dry the bars, so start checking at the 35-minute mark.
Can I double the recipe for a crowd?
Yes, you can easily double the batch. Just bake in a larger sheet pan, and keep an eye on the bake time—it may take a few minutes longer, depending on your oven and pan size.
What’s the best way to cut neat squares?
Let the Cherry Pie Bars cool completely and the glaze set before slicing. Use a sharp knife, wiping it clean between cuts for tidy, bakery-worthy squares every time. For extra clean edges, chill the bars briefly before cutting.
Final Thoughts
It’s hard not to fall in love with the comfort and cheer packed into every bite of these Cherry Pie Bars. Whether you’re baking for a family get-together, packing treats for a picnic, or just craving a nostalgic dessert, these bars are sure to put a big smile on your face. Round up those ingredients and give this classic-with-a-twist a try—your kitchen will smell amazing, and you might just discover a new favorite sweet!