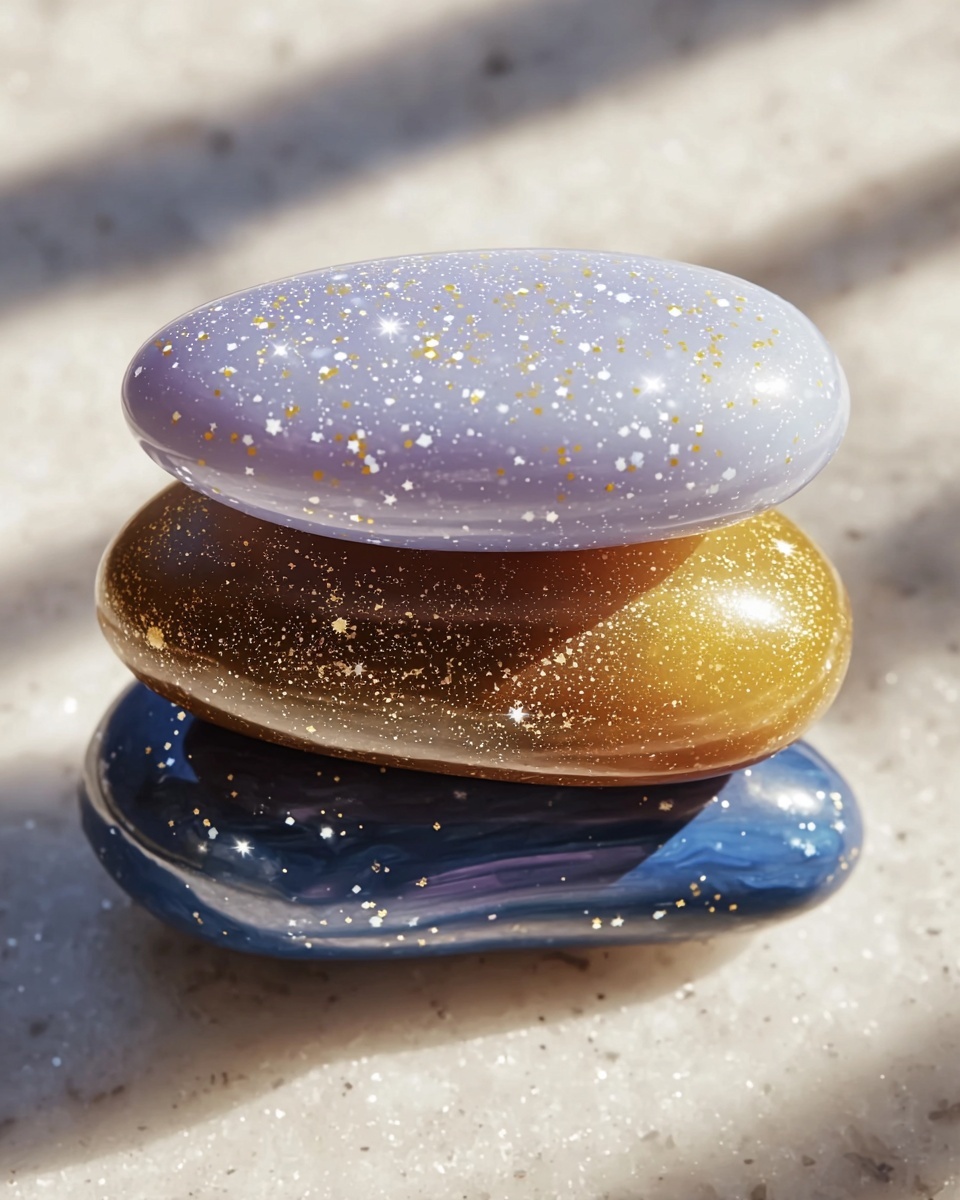
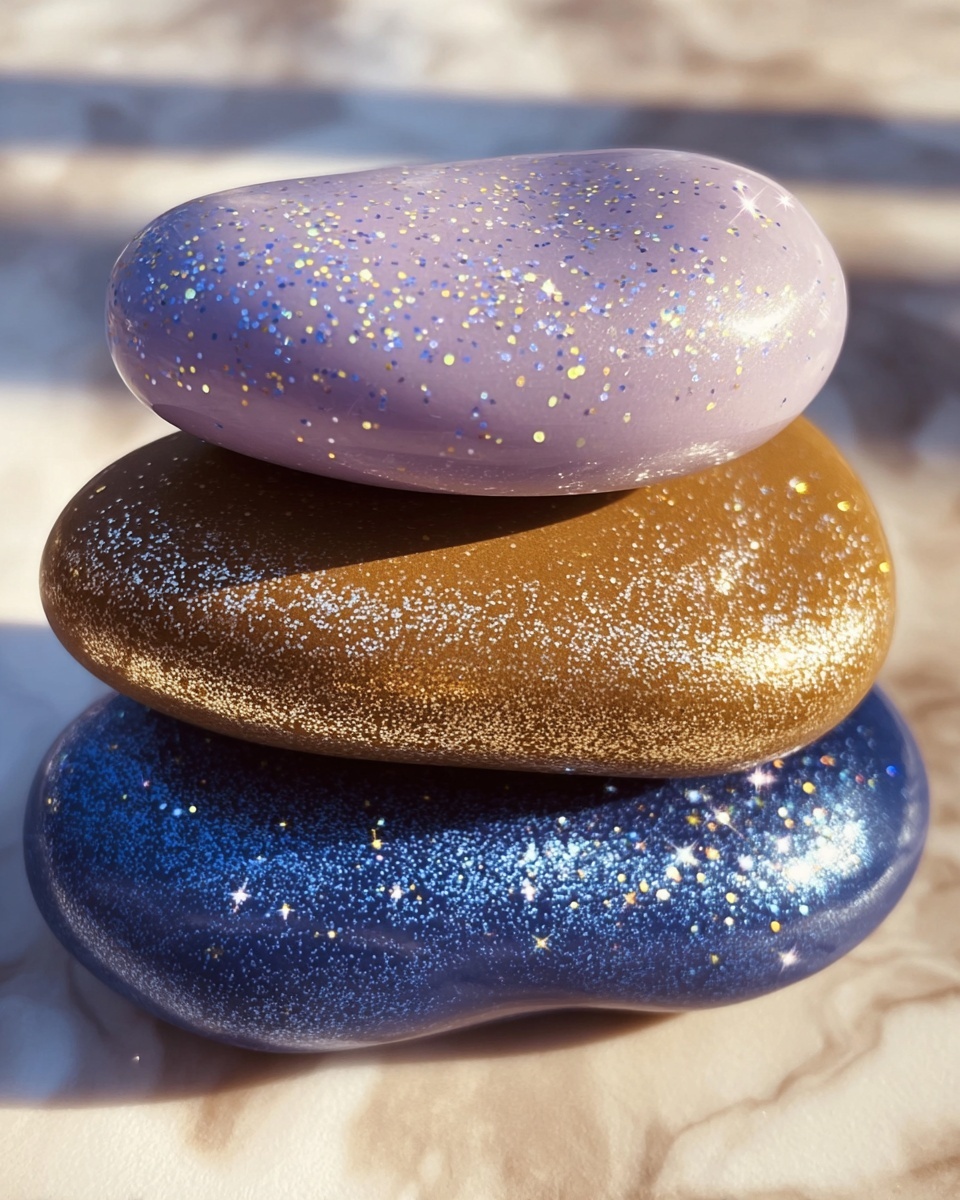
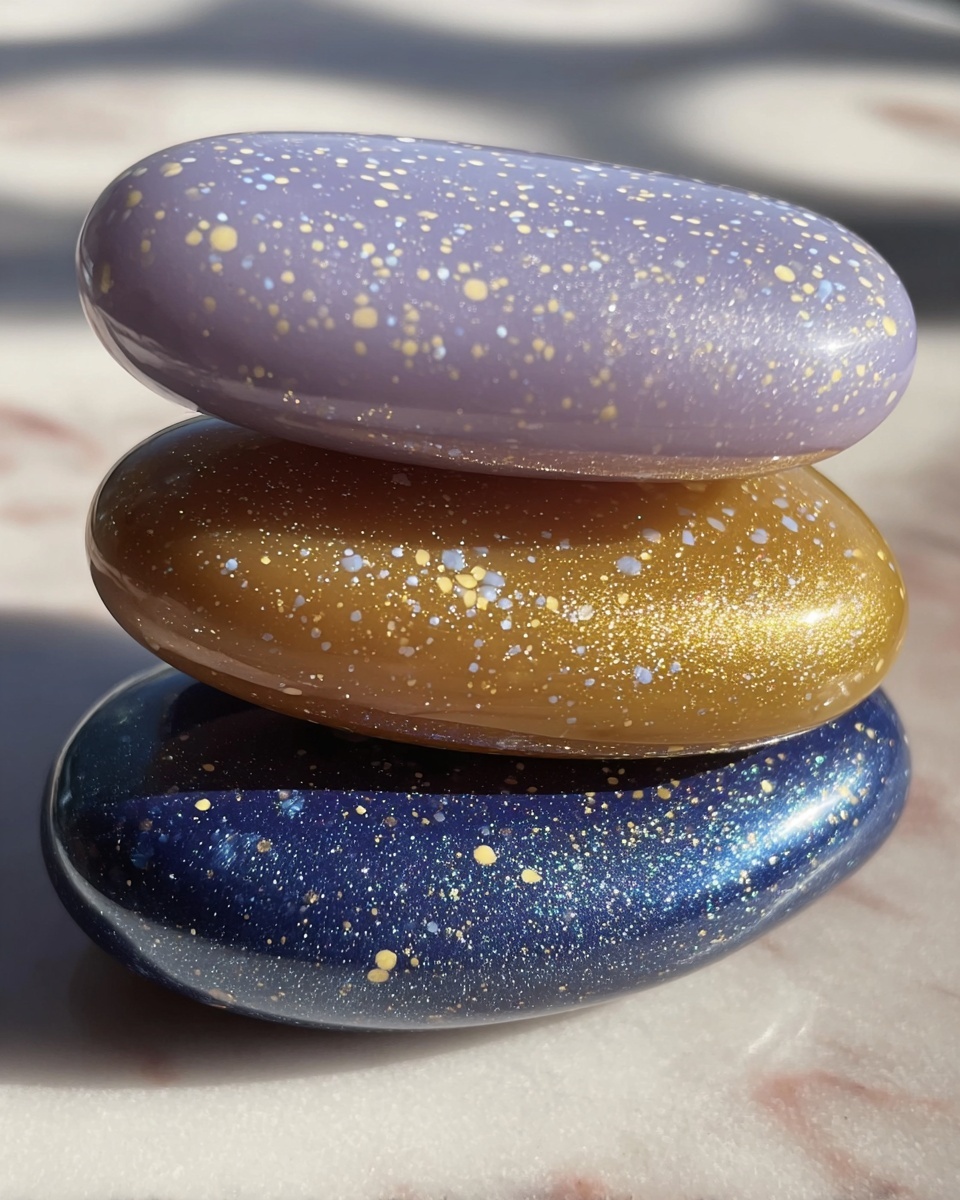
If you’re looking for a wonderfully simple craft that doubles as a soothing tool, the DIY Worry Stones: Craft Your Own Calming Gems Recipe is an absolute joy to make and use. These smooth, colorful stones fit perfectly in your hand, providing a calming tactile experience whenever you need a moment of zen. Plus, crafting your own worry stones means you can customize them with your favorite colors and even a touch of sparkle. It’s a delightful project that brings a little handcrafted peace into your everyday life.
Ingredients You’ll Need
Gathering your ingredients is a breeze because each one plays a vital role in making your worry stones just right. The combination of basics like flour and salt forms a sturdy base, while water brings everything together into a pliable dough. Adding food coloring and optional glitter lets your calming gems truly shine, making crafting as fun as the final piece.
- All-purpose flour: This creates the foundation for your dough, giving your stones shape and structure.
- Salt: Adds texture and firmness to the dough, helping your worry stones harden properly.
- Warm water: Binds the ingredients into a smooth, workable dough but can be adjusted for the perfect consistency.
- Gel food coloring: Choose your favorite hues to personalize and brighten each calming gem.
- Sparkly glitter (optional): For an enchanting touch that catches light and lifts your spirits every time you glance at your stones.
How to Make DIY Worry Stones: Craft Your Own Calming Gems Recipe
Step 1: Mix the Dry Ingredients
Start by combining your all-purpose flour and salt in a mixing bowl. Giving these two a thorough blend ensures your worry stones will have an even texture and the right firmness once dried.
Step 2: Add Warm Water Gradually
Pour warm water a little at a time into the flour and salt mixture. Stir steadily as you add, aiming for a dough that’s pliable but not sticky. If it feels too dry, gently splash in more water. If it gets too wet, sprinkle extra flour to balance the texture.
Step 3: Incorporate Gel Food Coloring
This is where the fun begins. Pick your favorite gel food coloring and add a few drops to your dough. Knead it well until the color spreads throughout evenly, giving a vibrant, consistent shade to your calming gems.
Step 4: Add Sparkle with Glitter (If Desired)
If you want a little extra magic in your worry stones, sprinkle in some fine or chunky glitter. Knead it through the dough, making sure the sparkle disperses evenly across each stone, giving them a subtle shimmer that delights the eye.
Step 5: Shape Your Stones
Take small chunks of your colored dough and start forming them into smooth ovals or pebble-like shapes. Don’t forget the key feature — press your thumb gently into the center of each stone to create a comforting indent, perfect for soothing fidgeting fingers.
Step 6: Let Them Dry Thoroughly
Arrange your stones on a parchment-lined tray and leave them to air dry for 24 to 48 hours. They’ll harden as they rest, becoming perfect little calming gems that fit just right in your palm.
How to Serve DIY Worry Stones: Craft Your Own Calming Gems Recipe
Garnishes
While worry stones aren’t edible, the way you finish and personalize them can be just as delightful as garnishing a favorite meal. Consider using a light dusting of mica powder or adding delicate hand-painted designs once dry to make each stone truly unique and meaningful.
Side Dishes
In the spirit of pairing, think about complementing your worry stones with a cozy cup of tea, a journal for reflective writing, or a calming playlist. These thoughtful companions create a holistic experience alongside your comforting gems.
Creative Ways to Present
Gift your DIY worry stones in small velvet pouches, glass jars, or wrapped in colored tissue as charming tokens of care. You can even string a few on a keychain or bracelet to keep your calming gems close throughout the day.
Make Ahead and Storage
Storing Leftovers
If you have any leftover worry stones, keep them in a dry, airtight container to preserve their shape and texture. Avoid humid environments, as moisture can soften the stones and reduce their longevity.
Freezing
This craft doesn’t lend itself well to freezing, as the dough hardens and dries naturally at room temperature. Instead, focus on air drying and storing properly to keep your stones in tip-top shape for whenever you need them.
Reheating
Since worry stones are not food items, reheating isn’t applicable. Their charm lies in their tactile presence and personalized touch, ready to calm whenever you hold them.
FAQs
Can I use other types of flour for this recipe?
All-purpose flour is recommended for the best texture, but you can experiment with whole wheat or gluten-free flours. Just be aware that the firmness and dryness time might vary slightly.
How long do the worry stones take to dry?
They generally take between 24 and 48 hours to dry completely, depending on humidity and thickness. Make sure they are hard to the touch before using them as calming gems.
Is the glitter safe to use?
Yes, as long as you use cosmetic or craft glitter that is non-toxic. Avoid using any glitter that might shed excessively, especially if you plan to handle the stones frequently.
Can children make these worry stones safely?
Absolutely! This is a fantastic kid-friendly project. Just supervise younger children during mixing and shaping to prevent mess and ensure the ingredients are handled gently.
What if my dough is too sticky or crumbly?
If it’s sticky, add a little more flour gradually. If it’s crumbly or dry, add a splash more warm water. The key is to achieve a smooth, elastic dough that feels soft but holds together well for shaping.
Final Thoughts
There’s something truly special about creating your own calming tools, and the DIY Worry Stones: Craft Your Own Calming Gems Recipe delivers joy from start to finish. Whether you’re crafting for yourself or as thoughtful gifts, these little stones carry a big dose of calm and creativity. Dive in, have fun, and let your hands shape serenity one colorful stone at a time!
Print
DIY Worry Stones: Craft Your Own Calming Gems Recipe
- Prep Time: 15 minutes
- Cook Time: 24-48 hours drying time
- Total Time: 24 hours 15 minutes to 48 hours 15 minutes
- Yield: Approximately 10-15 small worry stones depending on size
- Category: Craft
- Method: No-Cook
- Cuisine: N/A
Description
Create your own calming worry stones with this easy DIY recipe using simple household ingredients. These handcrafted stones are perfect for stress relief and can be customized with your favorite colors and sparkly glitter for a personalized touch.
Ingredients
Dry Ingredients
- 2 parts all-purpose flour
- 2 parts salt
Wet Ingredients
- 1 part warm water
Add-ins
- Gel food coloring (your choice)
- Sparkly glitter (fine or chunky, optional)
Instructions
- Mix Dry Ingredients: In a mixing bowl, combine the all-purpose flour and salt until they’re perfectly blended to create a consistent base for your dough.
- Add Water Gradually: Slowly pour in the warm water while mixing continuously to form a dough. Adjust by adding more water if the dough feels too dry or more flour if it’s sticky, aiming for a smooth, kneadable texture.
- Add Color: Choose your favorite gel food coloring and add a few drops to the dough, then knead thoroughly until the color is evenly incorporated and the dough is vibrant and smooth.
- Incorporate Glitter: Optionally, sprinkle some glitter into the dough and knead until the glitter is evenly distributed, giving your worry stones a subtle sparkle.
- Shape Stones: Divide the dough into small pieces and shape each into ovals or pebble-like forms. Create a thumb indent in the center of each stone for that classic worry stone feel.
- Dry the Stones: Arrange your shaped stones on a parchment-lined tray and allow them to air-dry undisturbed for 24 to 48 hours, or until completely firm and dry to the touch.
Notes
- If you want the stones to dry faster, consider placing them near a sunny window or in a well-ventilated area.
- The thickness of each stone will affect drying time; thinner stones will dry quicker.
- You can customize colors by mixing different gel food colorings before kneading.
- For a smoother surface, gently sand the stones lightly once dry using fine-grit sandpaper.
- These worry stones are decorative and not edible, so keep away from small children who might put them in their mouths.


