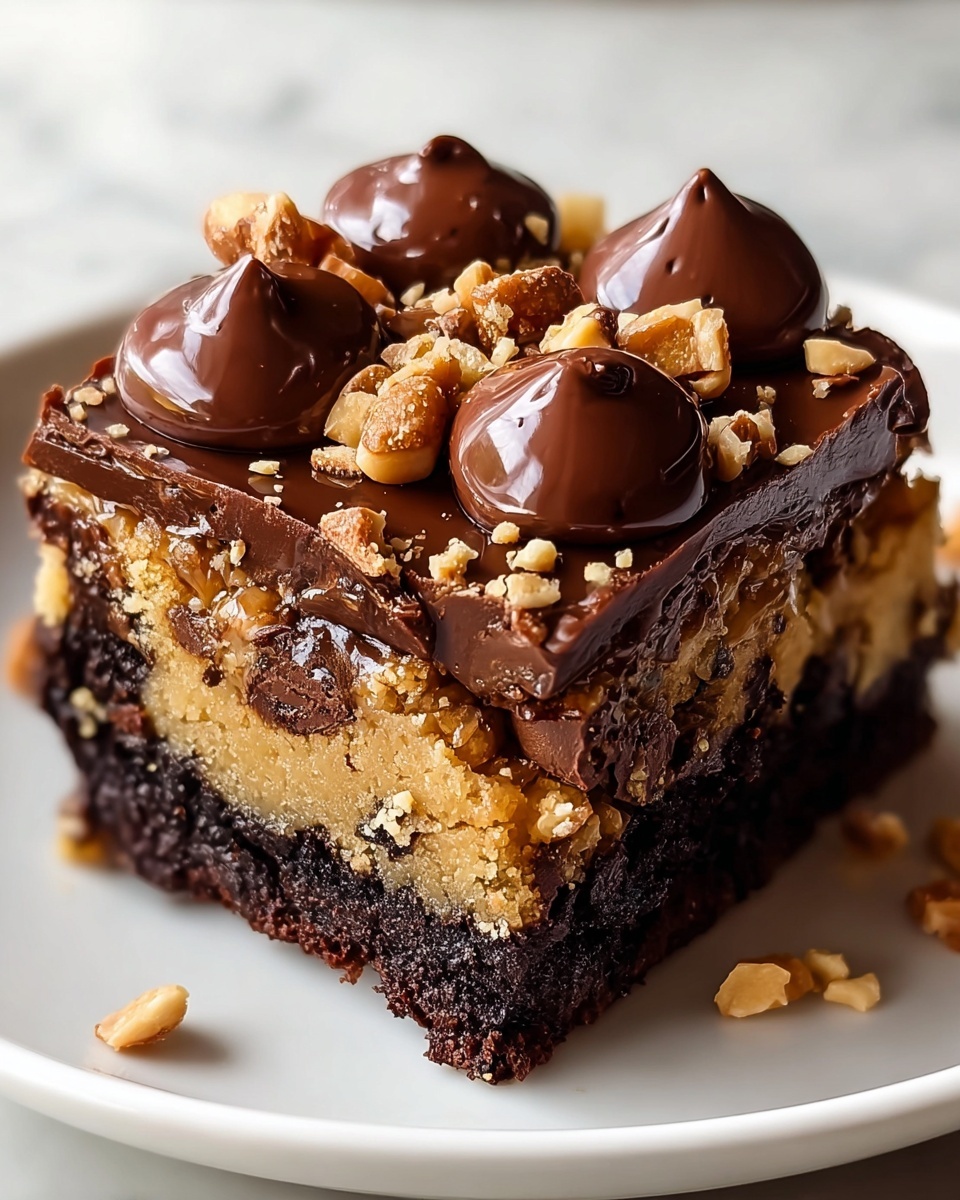
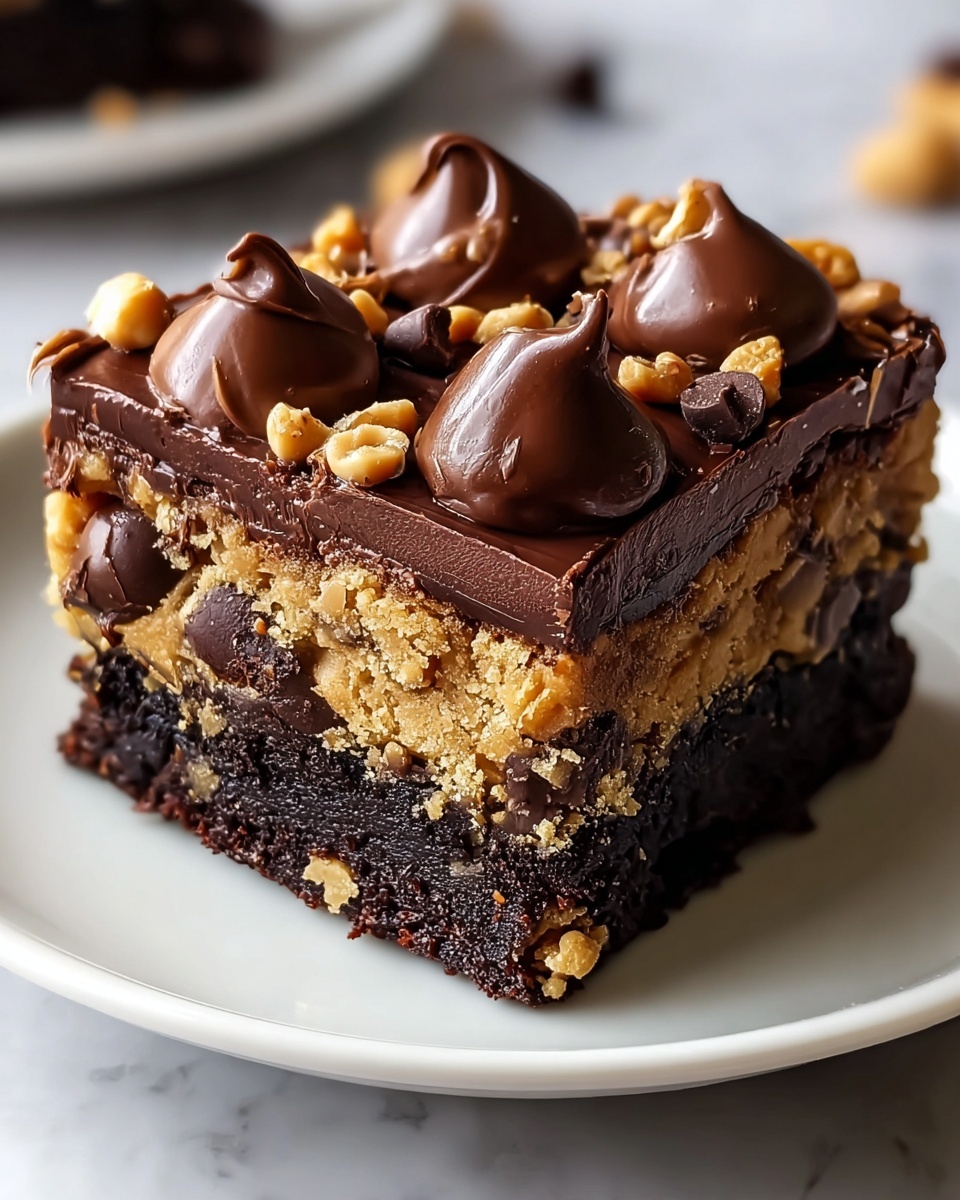
If you have a serious sweet tooth and crave something both rich and ridiculously easy, you are going to adore this Peanut Butter Cup Dump Cake Recipe. It’s a decadent chocolate and peanut butter lover’s dream, combining the smooth creaminess of peanut butter, the irresistible sweetness of chocolate cake mix, and the gooey goodness of sweetened condensed milk—all layered effortlessly into one pan. This dessert doesn’t just satisfy cravings; it practically demands to be shared with friends and family on any occasion. Trust me, once you try this, it’ll become your go-to dessert for celebrations or whenever you want an indulgent treat without fussing over complicated baking steps.
Ingredients You’ll Need
The magic of this Peanut Butter Cup Dump Cake Recipe comes from its straightforward yet perfectly balanced ingredients. Each component plays a crucial role, from the chocolate cake mix that provides a fluffy base to the peanut butter cups adding texture and bursts of flavor. The sweetened condensed milk is the secret that creates the moist, luscious layers, while the butter and chocolate chips ensure every bite melts in your mouth.
- Chocolate cake mix: Provides the rich, moist foundation without the work of mixing batter from scratch.
- Creamy peanut butter: Offers smooth, nutty flavor that enhances the chocolate and keeps the cake moist.
- Sweetened condensed milk: Adds sweetness and gooey texture, binding the layers together beautifully.
- Chopped peanut butter cups: Bring crunchy chocolate-peanut butter bits for delightful bursts of flavor throughout.
- Melted butter: Creates a crispy, golden topping that contrasts the tender cake underneath.
- Milk chocolate chips: Melt into pockets of pure chocolatey goodness.
- Optional whipped cream or vanilla ice cream: For serving, providing a cool, creamy finish that complements every bite.
How to Make Peanut Butter Cup Dump Cake Recipe
Step 1: Preheat and Prepare Your Dish
Begin by preheating your oven to 350°F (175°C) so it’s ready to go once everything is assembled. Grease a 9×13-inch baking dish to ensure the cake doesn’t stick, helping you achieve those perfect edges when serving.
Step 2: Layer the Peanut Butter and Candy
Spread the creamy peanut butter evenly across the bottom of the baking dish. This nutty base sets the tone for the flavor explosion. Then, sprinkle half of your chopped peanut butter cups over the peanut butter; these little pieces add delightful chewiness and chocolate bursts. Pour the sweetened condensed milk gently on top of the candy layer—this step is crucial because it sweetens and sticks everything together as it bakes.
Step 3: Add the Dry Cake Mix
Now it’s time to sprinkle the dry chocolate cake mix evenly over the wet layers below. This “dump” method means no batter mixing is necessary — just spread it out, and it will transform into a sumptuous cake during baking.
Step 4: Butter and Chocolate Chips Finish the Assembly
Drizzle melted butter evenly over the surface; this creates a golden, crispy crust that contrasts perfectly with the gooey inside. Then sprinkle the remaining chopped peanut butter cups and chocolate chips on top for extra chocolatey crunches. These finishing touches make this cake utterly irresistible.
Step 5: Bake Until Bubbly and Golden
Bake the cake for 35 to 40 minutes until the top is bubbling and slightly crisp. You’ll know it’s done when the irresistible aroma fills your kitchen and the edges pull slightly away from the pan.
Step 6: Cool and Prepare to Serve
Allow the cake to cool for about 10 to 15 minutes before serving. This resting time helps the layers to set perfectly and keeps the peanut butter from being too hot to enjoy. For that extra indulgent touch, top it off with whipped cream or vanilla ice cream, making each bite a spoonful of pure happiness.
How to Serve Peanut Butter Cup Dump Cake Recipe

Garnishes
To make your Peanut Butter Cup Dump Cake Recipe look as good as it tastes, consider sprinkling some extra chopped peanut butter cups on top just before serving. A dollop of whipped cream or a scoop of creamy vanilla ice cream creates a beautiful contrast in temperature and texture, making every bite even more delightful. Even a light dusting of cocoa powder or a drizzle of chocolate sauce can add an elegant touch.
Side Dishes
This dessert is quite rich, so serving it alongside fresh fruit, such as sliced strawberries or raspberries, can add a fresh, tangy balance. A simple cup of black coffee or robust espresso pairs wonderfully with the sweet flavors, helping to cleanse your palate and complement the richness.
Creative Ways to Present
If you’re making this for a party or potluck, try baking the cake in small ramekins for individual servings, making it feel extra special. You can also layer it in a trifle glass with whipped cream and extra peanut butter cups for a visually stunning dessert. For kids, adding sprinkles or mini chocolate chips on top brings a fun and festive vibe.
Make Ahead and Storage
Storing Leftovers
The Peanut Butter Cup Dump Cake Recipe keeps beautifully in the refrigerator for up to four days. Cover the dish tightly with foil or plastic wrap to prevent it from drying out. When chilled, the flavors actually meld together nicely, making the cake even more decadent the next day.
Freezing
You can freeze leftover cake by wrapping individual slices or the whole pan securely with plastic wrap and foil. It’s best to freeze for no longer than two months. When you’re ready to enjoy again, thaw overnight in the fridge before reheating gently.
Reheating
To reheat, warm the cake slices in the microwave for about 20 to 30 seconds or place them in a preheated 325°F oven for 10 to 15 minutes. This brings back the gooey texture and slightly crisp edges, almost as delightful as fresh from the oven.
FAQs
Can I use crunchy peanut butter instead of creamy?
Absolutely! Crunchy peanut butter will add an extra layer of texture and nutty crunch to your dump cake, making it even more interesting to bite into. Just spread it the same way you would creamy peanut butter.
Is this cake gluten-free?
Unfortunately, most store-bought chocolate cake mixes contain gluten, so this recipe is not gluten-free as is. However, you can substitute with a gluten-free chocolate cake mix to customize it for gluten intolerances.
Can I substitute the chocolate cake mix with brownie mix?
Yes, using brownie mix instead of cake mix will give a denser, fudgier texture, which would be delicious as well! Keep the rest of the layers the same for a slightly different but equally indulgent dessert experience.
Do I need to refrigerate the cake before serving?
No need to refrigerate before serving. Allow the cake to cool slightly after baking so it sets well, but serving it warm or at room temperature is just perfect. Refrigerate only if you plan to keep leftovers.
Can I make this recipe vegan or dairy-free?
To make a dairy-free or vegan version, look for dairy-free chocolate cake mixes and substitute the butter with coconut oil or vegan butter. Use plant-based sweetened condensed milk alternatives and vegan chocolate chips to keep all the flavors rich and satisfying.
Final Thoughts
This Peanut Butter Cup Dump Cake Recipe is truly one of those desserts you want to make again and again. It takes the fiddliness out of baking while delivering maximum flavor and joy with minimal effort. Whether you’re impressing guests or just treating yourself, it’s a recipe that feels like a warm hug on a plate. Go ahead and whip it up—you won’t regret a single decadent bite!
Print
Peanut Butter Cup Dump Cake Recipe
- Prep Time: 10 minutes
- Cook Time: 35 minutes
- Total Time: 45 minutes
- Yield: 12 servings
- Category: Dessert
- Method: Baking
- Cuisine: American
Description
This Peanut Butter Cup Dump Cake is a luscious, easy-to-make dessert combining rich chocolate cake mix, creamy peanut butter, and sweetened condensed milk layered with chopped peanut butter cups and milk chocolate chips. Baked to bubbly perfection, it’s the ultimate indulgence for peanut butter and chocolate lovers, served best warm with whipped cream or vanilla ice cream.
Ingredients
Base and Cake Mix
- 1 box chocolate cake mix
- ½ cup melted butter
- 1 can (14 oz) sweetened condensed milk
Peanut Butter and Candy
- 1 cup creamy peanut butter
- 1 ½ cups chopped peanut butter cups (plus extra for garnish)
- 1 cup milk chocolate chips
Optional Toppings
- Whipped cream or vanilla ice cream for serving
Instructions
- Preheat Oven: Preheat your oven to 350°F (175°C). Grease a 9×13-inch baking dish thoroughly to prevent sticking.
- Layer Ingredients: Spread the creamy peanut butter evenly across the entire bottom of the prepared baking dish. Then sprinkle half of the chopped peanut butter cups over the peanut butter layer. Carefully pour the entire can of sweetened condensed milk evenly over the peanut butter cups layer, ensuring good coverage.
- Add Cake Mix: Sprinkle the dry chocolate cake mix evenly over the condensed milk layer in the baking dish, spreading it out smoothly to cover all liquid underneath.
- Add Butter and Chocolate Chips: Drizzle the melted butter evenly over the top of the cake mix. Next, sprinkle the remaining chopped peanut butter cups and the milk chocolate chips evenly over the buttered cake mix layer.
- Bake: Place the baking dish in the preheated oven. Bake uncovered for 35 to 40 minutes or until the top is bubbly, slightly crisp, and a knife inserted near the center comes out with moist crumbs but not wet batter.
- Serve: Remove the cake from the oven and let it cool for 10 to 15 minutes to set slightly. For an indulgent treat, serve warm topped with whipped cream or vanilla ice cream and garnish with extra chopped peanut butter cups.
Notes
- Make sure to evenly distribute the peanut butter and other layers for best texture and flavor balance.
- If you prefer a less sweet dessert, reduce the amount of peanut butter cups or use low-sugar chocolate chips.
- This cake can be made ahead of time and reheated gently before serving.
- Store leftovers covered in the refrigerator for up to 3 days.
- Use a 9×13 inch baking dish to ensure proper baking time and texture.

