
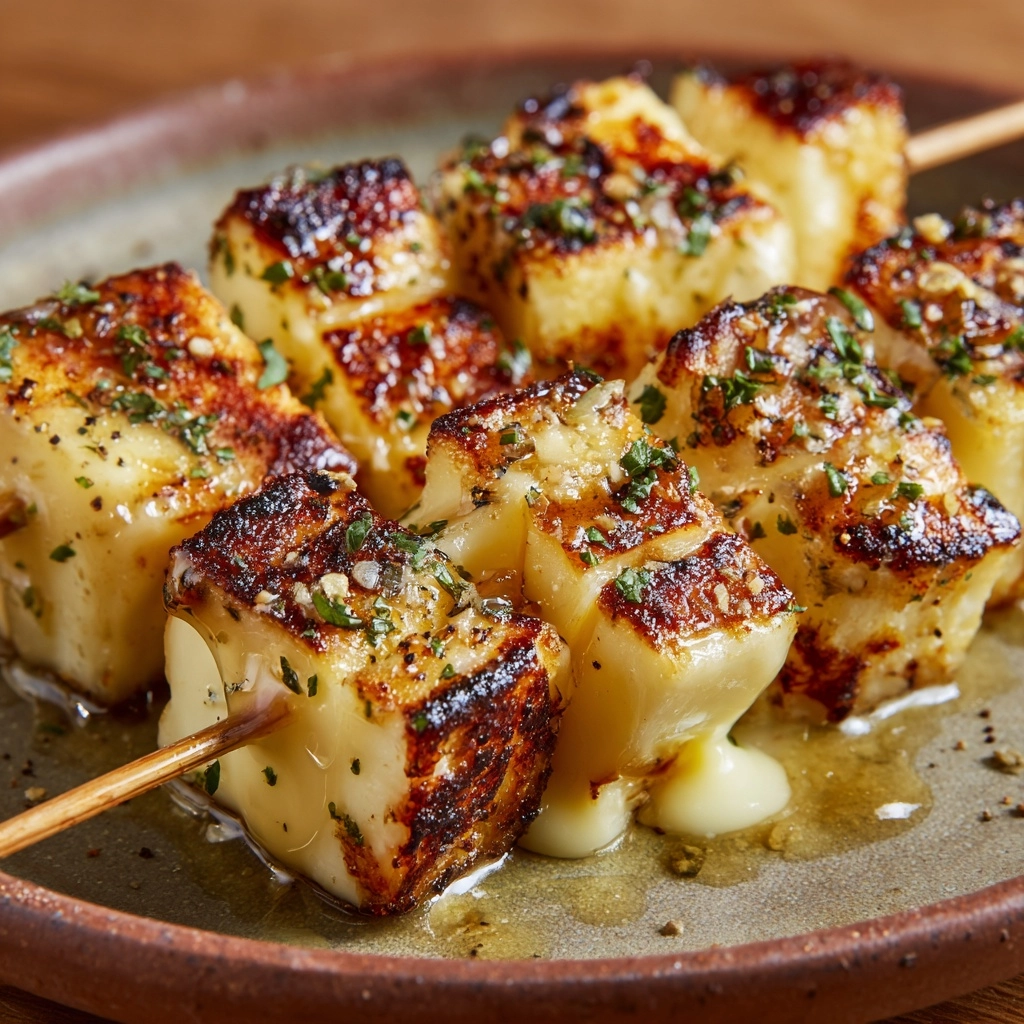
Imagine the crunch of golden, buttery bread and creamy melted cheese, all in one perfectly portioned bite—these Grilled Cheese Skewers are pure comfort food fun! Whether you’re reimagining a beloved childhood classic for a dinner party or looking for a clever finger food for the kids, this party-ready twist brings all the irresistible flavors of a traditional grilled cheese—plus a little bit of magic with every skewer. Let’s dive into the irresistible charm that makes Grilled Cheese Skewers the ultimate crowd-pleaser you’ll want to serve again and again.

Ingredients You’ll Need
You’ll be amazed at how just a few everyday ingredients come together to make Grilled Cheese Skewers so memorable. Each one plays a special part in giving these bites their iconic flavor, gooey middle, and that addictive golden edge!
- Thick-cut bread: Using a sturdy, hearty bread helps hold up all that delicious cheese and gives great texture after grilling.
- Softened butter: Generously smeared on the bread, butter creates that classic golden, crispy crunch you crave in every bite.
- Shredded cheddar cheese (or cheese of choice): Melts beautifully for that stringy, gooey interior—don’t be afraid to get creative with your favorite cheeses!
- Garlic powder (optional): Just a sprinkle brings a warm, savory kick—perfect for grown-up palates.
- Dried oregano (optional): Adds a whisper of herby flavor that makes every morsel just a little more special.
- Wooden skewers: These make it easy to serve, dip, and devour—plus, they look adorable on a platter!
- Cooking spray or extra butter for grilling: Helps ensure your sandwiches pop right off the pan with that perfect finish.
How to Make Grilled Cheese Skewers
Step 1: Prep the Bread
Start by laying out your bread slices on a cutting board. Spread a generous layer of softened butter on one side of each slice; this step is your ticket to that unmistakable crunch. If you’re adding garlic powder or oregano, sprinkle them right onto the buttered sides so the flavors infuse as they grill.
Step 2: Add Cheese and Assemble
Flip the bread over so the buttered side faces down. On four slices, pile on that shredded cheese—go as generous as your heart desires! Top with the remaining bread slices, again leaving the buttered side facing out. Now you have four overstuffed, ready-to-grill sandwiches.
Step 3: Grill to Perfection
Heat a skillet or griddle over medium heat and lightly coat it with cooking spray or an extra swipe of butter. Place the sandwiches onto the skillet and let them cook undisturbed for about 2–3 minutes per side, or until both sides are a glorious golden brown and the cheese is beautifully melted inside.
Step 4: Slice and Skewer
Let the sandwiches cool for just a minute so they’re easier to handle. Using a sharp knife, cut each sandwich into 4–6 bite-sized cubes—aim for pieces that’ll stay snug on the skewers. Carefully thread the cubes onto wooden skewers, mixing and matching for extra flair if you like!
Step 5: Serve and Enjoy
Arrange your Grilled Cheese Skewers on a platter and serve right away for maximum melty goodness. Pair with a side of warm tomato soup or your favorite dipping sauce for the complete experience.
How to Serve Grilled Cheese Skewers
Garnishes
A sprinkle of chopped fresh herbs like parsley or chives on top adds an instant pop of color and a burst of freshness. For a finishing flourish, a pinch of flaky sea salt or a dusting of grated parmesan can level up your Grilled Cheese Skewers.
Side Dishes
These skewers are a superstar alongside a bowl of tangy tomato soup (for that timeless dunk!) or a crisp green salad. They’re also fantastic on a party spread with pickles, veggie sticks, or a zippy dipping sauce like marinara or ranch.
Creative Ways to Present
Let your imagination shine! For a fun family dinner, serve Grilled Cheese Skewers in mason jars with soup in the bottom or arrange them in a fan shape on a slate board for parties. For kids, use cookie cutters to make different shapes before grilling—stars, hearts, or dinosaurs make snack time magical!
Make Ahead and Storage
Storing Leftovers
If you’re lucky enough to have leftovers, refrigerate your Grilled Cheese Skewers in an airtight container. They’ll stay fresh for up to 2 days, but will lose some of that signature crispness—making them perfect candidates for reheating!
Freezing
You can absolutely freeze unskewered grilled cheese cubes once they’re completely cooled. Place them on a parchment-lined tray until firm, then transfer to a freezer-safe bag or container. When you’re ready, just thaw and pop them in the oven to restore that melty magic.
Reheating
To get that toasty edge back, heat leftover Grilled Cheese Skewers in a 350°F oven for 8–10 minutes, or until warmed through and the cheese is melty. Avoid the microwave if you can—it can make the bread a bit soggy.
FAQs
Can I use different kinds of cheese in Grilled Cheese Skewers?
Absolutely! Try mozzarella for serious stretch, pepper jack for a spicy kick, or provolone for a mild, creamy flavor. Mixing cheeses can create even more irresistible combinations.
What kind of bread works best for Grilled Cheese Skewers?
Thick-cut sandwich bread, sourdough, or any sturdy loaf will hold up best when cubed and skewered. Avoid thin or overly soft bread, as it can get mushy after grilling and cutting.
Can I make Grilled Cheese Skewers ahead of time for a party?
You sure can! Grill, cube, and skewer the sandwiches up to a few hours in advance. Reheat gently in the oven just before serving for melty perfection that tastes freshly made.
Are Grilled Cheese Skewers safe for kids to eat?
Definitely! Just monitor younger children while they eat, especially with the wooden skewers. For toddlers, you can serve the grilled cheese cubes without skewers or use kid-safe picks.
What dips go well with Grilled Cheese Skewers?
Classic tomato soup is always a hit, but you can offer a variety of dips like ranch, honey mustard, or a spicy marinara for extra flavor. Cheese sauce or avocado dip would also be delicious!
Final Thoughts
If you’re searching for a no-fuss way to make everyone at the table grin, you can’t go wrong with Grilled Cheese Skewers. They’re easy, endlessly adaptable, and just plain fun to eat. Give them a try—they might just become your new go-to for gatherings, cozy nights in, and every snack craving in between!
Print
Grilled Cheese Skewers Recipe
- Prep Time: 10 minutes
- Cook Time: 10 minutes
- Total Time: 20 minutes
- Yield: 16–24 skewer pieces
- Category: Appetizer
- Method: Stovetop
- Cuisine: American
- Diet: Vegetarian
Description
These Grilled Cheese Skewers are a fun twist on the classic grilled cheese sandwich, perfect for parties or as a kid-friendly snack. Cubes of gooey, melted cheese sandwiched between buttery bread are skewered for easy serving and dipping. A delicious and easy appetizer that will be a hit with both kids and adults.
Ingredients
Bread:
- 8 slices thick-cut bread
Butter:
- 2 tablespoons softened butter
Cheese:
- 1 1/2 cups shredded cheddar cheese (or cheese of choice)
Seasonings (optional):
- 1/2 teaspoon garlic powder
- 1/2 teaspoon dried oregano
Additional:
- Wooden skewers
- Cooking spray or additional butter for grilling
Instructions
- Prepare Bread: Butter one side of each bread slice and sprinkle with garlic powder and oregano if desired.
- Assemble Sandwiches: Place cheese on four slices, top with remaining slices to form sandwiches.
- Grill Sandwiches: Grill for 2–3 minutes per side until golden and cheese is melted.
- Cut and Skewer: Cut sandwiches into bite-sized cubes, skewer onto wooden skewers.
- Serve: Serve warm with optional dipping sauce or tomato soup.
Notes
- Experiment with different cheeses like mozzarella or provolone for variety.
- For a fun twist, cut sandwiches into shapes before skewering.
Nutrition
- Serving Size: 3 skewer pieces
- Calories: 180
- Sugar: 1g
- Sodium: 270mg
- Fat: 11g
- Saturated Fat: 6g
- Unsaturated Fat: 4g
- Trans Fat: 0g
- Carbohydrates: 14g
- Fiber: 1g
- Protein: 6g
- Cholesterol: 25mg


